
Ublox GPS modules are used heavily in HAB due to their high performance, altitude limit and power usage. They are extremely well documented. By default they output NMEA strings at 9600 baud but with a max altitude limit of 12km . There are a number of ways to communicate with the module NMEA, PUBX or the binary UBX protocol.
For these examples we are going to use a HAB Supplies uBLOX MAX-M8Q Breakout With Quad-V Antenna for Arduino linking to an Arduino Duemilanove.
Basic Operation Test
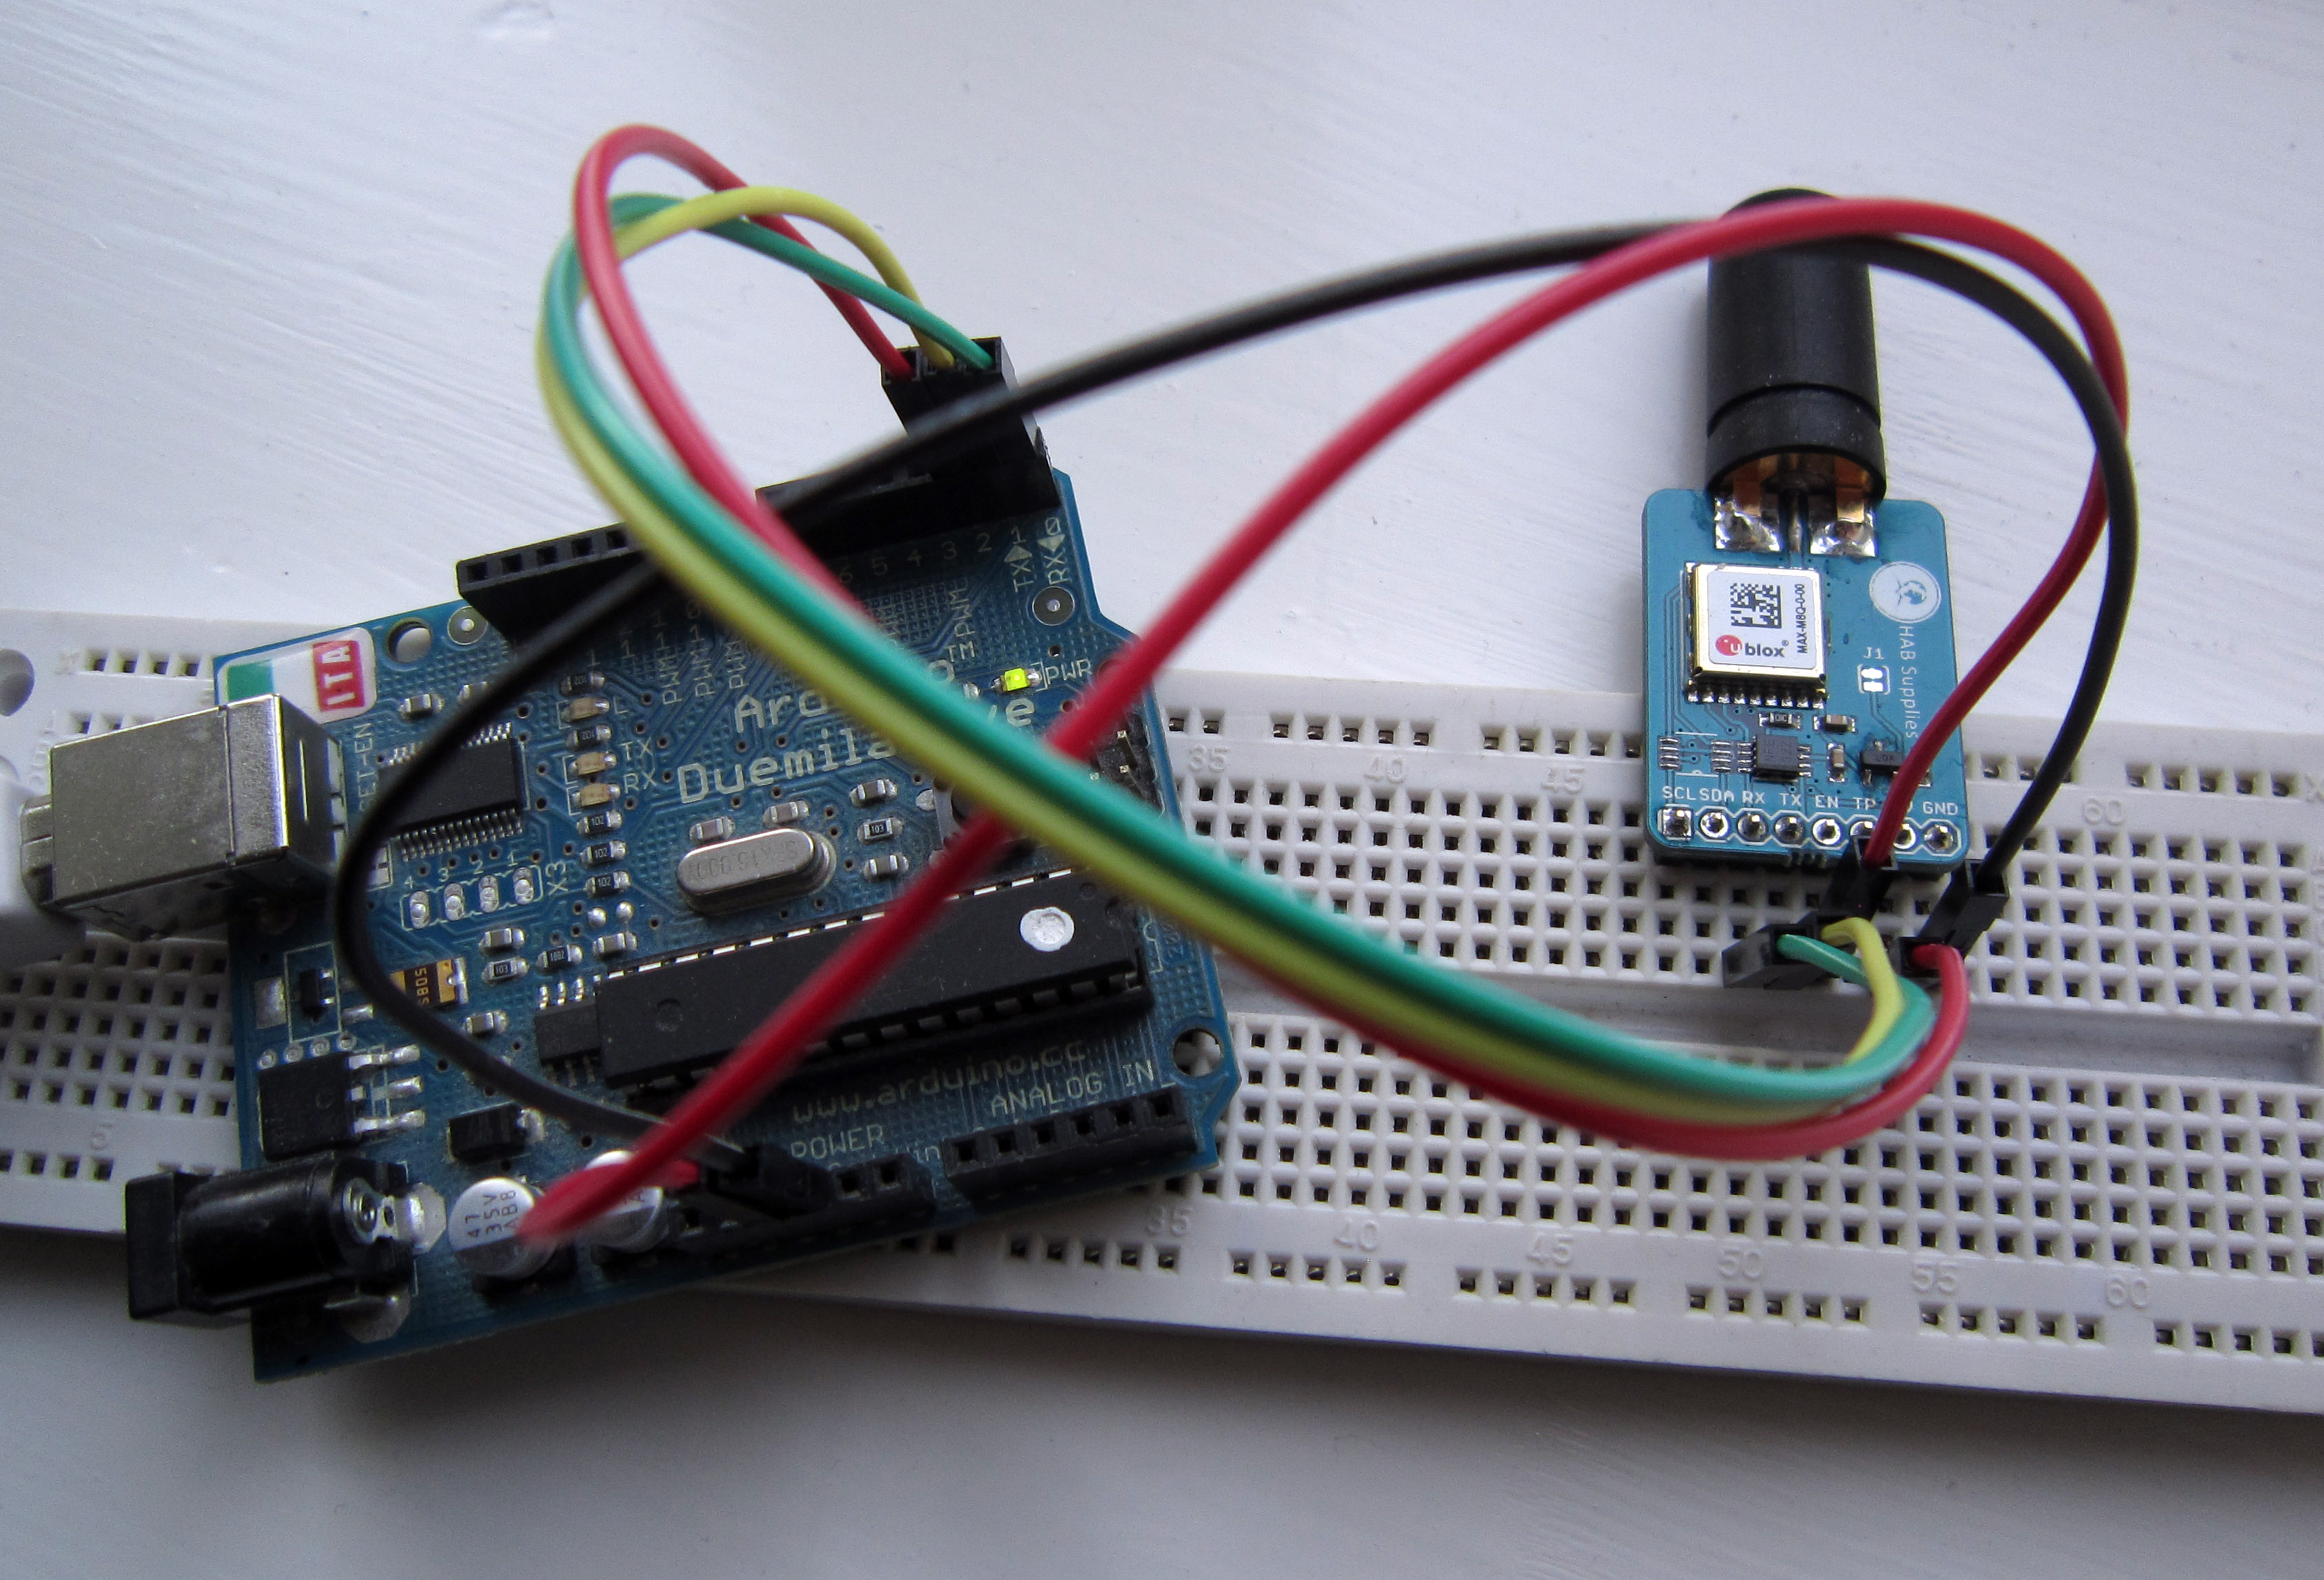 Connect as follows :
Arduino 5V to GPS Board 5V
Arduino GND to GPS Board GND
Arduino Pin 0 (RX) to GPS Board RX
Arduino Pin 1 (TX) to GPS Board TX
Arduino Pin 2 to GPS Board EN
Load the following sketch. All this does is turn the level convertor on the GPS Board so data from the GPS module is passed through to the Arduinos USB to Serial port.
#define GPSENABLE 2

void setup() {
 pinMode(GPSENABLE, OUTPUT);
 digitalWrite(GPSENABLE, HIGH);
}

void loop() {
}
Once loaded press the serial monitor button in Arduino and you should see NMEA strings being output :
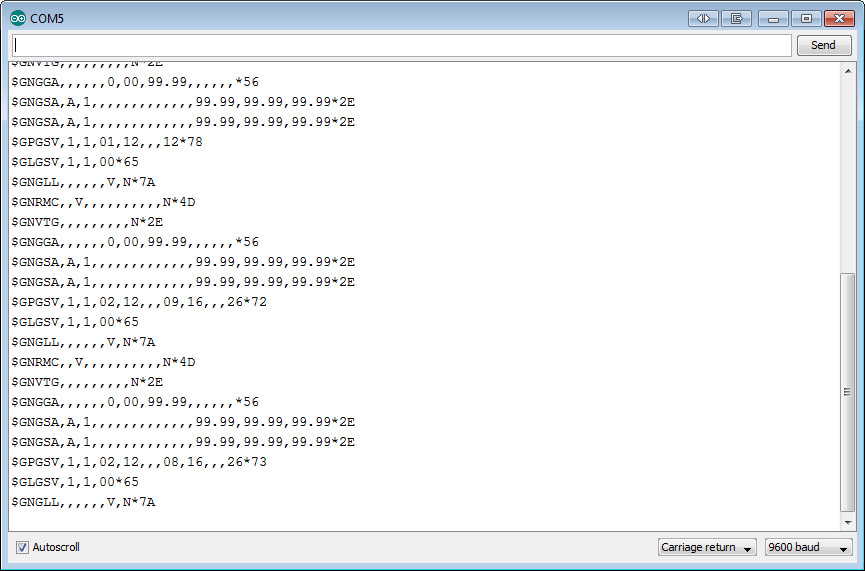 If you stick the module in a window or outside you should start to see a clock and then actual location information. At this point if you’re a Windows user you can go download the Ublox U-Center. All the commands referenced in the following examples were obtained via U-Center. Close Arduino down, open U-Center and point it at the Arduino’s COM port :

Note the GLONASS Satellite (Russian flag). Ok so how do we use this to ascertain the commands we want to send to the GPS module to put it in high altitude mode.
In Ucenter click View -> Messages.
Click the + next to NMEA to collapse it and then click the + next to UBX to expand it. Click + next to CFG to expand. UBX-CFG is where most of the configuration commands for the Ublox modules are located. All these commands are covered in extreme detail in the Ublox Receiver Description Including Protocol Specification.
However I’ll advise the setting to enable operation above 12km is down UBX-CFG-NAV5. Click NAV5. If you drop the dynamic model box down from the default 0 – Portable mode to 6 – Airborne < 1g you will notice the table at the bottom kindly gives the binary string you need to send to the module to enable this mode :
0000 B5 62 06 24 24 00 FF FF 06 03 µb $$ ÿÿ 000A 00 00 00 00 10 27 00 00 05 00 ' 0014 FA 00 FA 00 64 00 2C 01 00 3C ú ú d , < 001E 00 00 00 00 C8 00 00 00 00 00 È 0028 00 00 1A 28
So basically we need to send this to the GPS module and check it acknowledges it. This is discussed in Part 2 of this article.
Hi, I have just uploaded the Ublox Part 2 programme, but the Serial Monitor only produces gobledeygook.
I am using a HAB Supplies Ublox 7 GPS (5v) with the specified pin arrangement.
Any help to sort out the problem would be greatly appreciated.
Best wishes,
Colin.
Hi Colin,
Check the baud rate on the serial monitor is set to 9600.
Anthony
hi, j
ust recieved my ublox Max M8Q gps, and just hooked it up as above to my arduino as described in ‘Getting started with Ublox Part 1 – Basic Operation of the Breakout Board’
failed at the first hurdle! not getting any data out as described when you open the serial monitor?
bryn
Hi Bryn,
Can you double check the connections and reverse RX and TX to see if this makes a difference. Also ensure you have the EN (Enable) pin connected to +5V.
Cheers
thanks for the reply Anthony,
your pin config on the page says ‘GPS EN to Arduinio Pin 2’
Arduino 5V to GPS Board 5V
Arduino GND to GPS Board GND
Arduino Pin 0 (RX) to GPS Board RX
Arduino Pin 1 (TX) to GPS Board TX
Arduino Pin 2 to GPS Board EN
does that mean the test code is different as well as pin 2 is defined as output in the first line??
All we are doing in the code is defining pin 2 as an output then pulling this high which sends 5V to the EN pin. You can omit this step and just connect it direct to 5V. It turns the level convertor on.
Hi,
A few questions from a beginner:
1. Can one utilize an arduino pro-mini (small size needed for use in rocketry).?
2. Any additional recommendations for use as a GPS tracker with a radiometrix 144.39 MHZ, 300 mw transmitter via APRS?
Thanks for your time & consideration.
Fred
Hi Fred,
I think you got me on e-mail but also here:
1/ Yes you can do it with a MiniPro (5V if you’re using HX1) but the Habduino board doesn’t connect up to a Pro Mini (circuit diagrams are open source).
2/ As below.
My expertise isn’t rocketry our ascents are generally a more sedate affair 🙂 I would probably suggest the Habduino isn’t really suitable due to the size of the board (though depends how big your rocket is). You could do APRS or other transmission via the 434Mhz transmitter (Something http://www.cusf.co.uk/ are doing right now in the States : https://twitter.com/cuspaceflight
Another note the GPS is in dynamic model 6 which means if you exceed 1000 knots or 1G acceleration you’ll lose fix until such point as it returns under those ratings. You could mod the code to put it in model 8 which is 1000 knots or 4G.
Hope this lot helps!
Hi,
I tried connecting the GPS to the arduino with the code above but did not get any output. I also tried to connect it by reversing Rx and Tx but that did not make a difference. The voltage at the Tx pin appears to be a constant 3.4V and the voltage at Rx appears to be 5V. What could I be doing wrong? Thanks
Hi there did you connect EN to VCC ? (Enable needs pulling high). Cheers
Hi, I’d like to use the Arduino Uno board’s TX pin to transmit the data from this gps module, seems like double usage is going to get me into trouble, is it?
Thx!
Not the Uputronics board as it has a level convertor on it which is off by default so you can program your Arduino away, enable the level convertor and away you go.
If you want diagnostic info out I suggest you utilise software serial.
Hi admin, I am confusing about the coding part. Does it really no need any arduino library to support your coding? And if possible can please provide a complete version of coding. Thank you.
Hi admin, I successfully tested my GPS! Thank you so much!
Hi, I’m using the Lax M8Q and it seems to be working great!
I was wondering though if the setting to flight mode is lost when the device is powered down? In other words, do I need to reset to flightmode before each use?
Erik
Thats correct Erik,
The MAX has no EEPROM so you need to set mode each time (or attach a battery to keep settings).
Thanks Anthony, omitting that could ruin our HAB mission!
Hi, I’m using u-blox neo M8N gps and using your instructions I got it to work! One question though, for me altitude reading is around 250 m, I can also see on your screenshot yours was above 300 meters. Is it not accurate at low heights or it is a matter of which point it considers references as 0 meters altitude?
Thank you, Hrvoje
Hi Hrvoje,
No mine was pretty accurate I live 310 meters ASL 🙂 You can check it with Google Earth hold your cursor over your location and it tells you the height above sea level down at the bottom right. But yes you’re correct vertical accuracy differs from horizontal accuracy. I’d estimate +/-10 meters but the information isn’t in the datasheets.
Cheers,
Anthony
Hi, i really need some help.
In my school we are doing a project where we send a balloon into ‘space’ and it records video, takes readings and all that. And its my job to do the electronics.
Now, i have the sensor and i can get readings from it normally when connected to my computer, but i was wondering. how can i receive these readings remotely because we are using this GPS to track where it lands eventually.
I really need help because i’m kinda stuck right now and i need to find a way soon.
Thanks, Jonathan