Category Archives: Uncategorized - Page 8

Parachutes, Cameras, pointy antennae and crap GPS antenna

1/ Parachutes

Having done some testing I just wasn’t happy with the slack parachute load bearing through the centre option, I just couldn’t get it to work for me with tangles and the complexity. Instead I decided to go with the parachute as a load bearing option so I duly ordered some nice pink 36″ chutes from Sphereachutes in the US. I forgot to tick the balloon attachment option which is a “DOH!” moment but I’ll go see a local clothing alterations person and see if they can assist. JGC did a great diagram here :

2/Cameras

After some through putting the small video camera on a boom was probably not a wise move, at least for the first flight. Having reviewed other peoples launch videos it can get quite violent up there. I just don’t think the payload capsule is strong enough to withstand something out on a boom if the going gets rough. So I have therefore brought the video camera inside the payload capsule. After some hacking away its now point outwards from the relative safety of inside the payload.

3/ Antennae

Again after reviewing others launches the antenna can get knocked about a bit and it was going to get bent dangling down like that, so I’ve pulled it up closer to the payload. Now the N-Type connector is embedded in the actual payload container. and I’ll tape the radials to the bottom of the payload at launch time. Additionally the main element will have a bit of pink gaffer on the end of it so anyone watching it come down doesn’t get it in their eye. Again for Ava 2 going to take the suggestion of a member of the local HAM club and use copper tape on the bottom of the payload as radials and something more deformable as the main element. Oh finally Nigeys tested the antenna design and it came back with an SWR of 1:1.5.

4/ GPS Antenna

Finally, I noticed the GPS lost its signal again to fix it I had to wiggle the antenna, this isn’t really desirable but I don’t have any choice at the moment. Ava2 will be fixed in place in a chassis with a fly lead to an external SMA connector. Fingers cross it holds up at launch time :/

HOWTO : Linking an Arduino to a NTX2 Transmitter Part 2

This article has been moved here : http://ukhas.org.uk/guides:linkingarduinotontx2


HOWTO : Linking an Arduino to a NTX2 Transmitter Part 1

This article has been moved please visit :

http://ukhas.org.uk/guides:linkingarduinotontx2


Rob Harrison Presentation at Leeds Uni

Went to meet Rob last night at Leeds Uni where he was giving a presentation on his imaging. A very studious crowd seemed to really enjoy what was said and there were many questions afterwards.

Also as a bonus I learnt a few things immediately. My aerial has 4 radials, you only need two. This is great as the thing is a nightmare to store and transport with 4 radials.

Had a good chat with Rob afterwards and thanks for the drink Rob!

Update

Haven’t updated for a while but as usual alot has happened. In summary I’m almost ready to launch.

  1. Testing

    The final long range radio test was planned. I was going to put the payload at my parents then head over to the moors 4 miles away and check reception, this was cancelled due to yet more snow and crappy weather. However Rob Harrison  did a quick radio check with me and was able to pick up and decode the payload from 10 miles away despite the payload being inside and not LoS. Bit of a result that ! Cheers for the help Rob.This concludes the final test I need to do on the flight electronics. Interestingly I’m still on the same Energizer Lithiums so they can power the radio for at least 48 hours and I suspect longer.

  2. Parachutes

    Both my 36″ normal and 48″ X-Form parachutes have turned up. Calculated theoretical decent rates but need to wait for the weather to get better to do some proper tests with simulated payload.

  3. Camera

    I loved Timobel’s AEE MDS spy cam footage of his flight so I located one of the cameras on E-Bay AEE MD91 for £50 :However unlike Timobel I have decide to mount this camera externally pointing back at the payload. I’m hoping to be the first to see what the payload looks like whilst up there with this really bad mockup 🙂

    To keep it running whilst up there I’ve run a USB cable from 4 x AAA batteries in the payload to the camera externally. Fingers crossed the temperature won’t kill it!

iPhone Chase Car Tracker

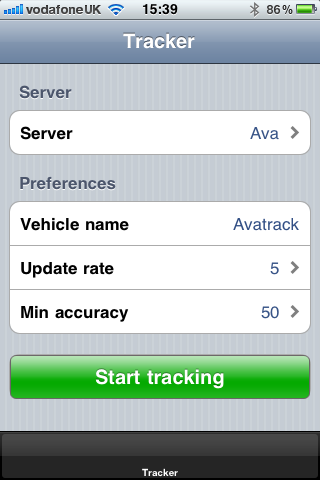
One of my engineers at work Matt has been working on an iPhone based Chase Car tracking app, it allows for the chase car to plot its position on the tracker without the need for any seperate GPS unit.

Screen shots :

Needs a little polishing but almost

there.

24 hour cold soak test

I thought I’d make some use of the cold weather we are having and do a soak test of the flight computer. After taping up the camera hole (Weather forecast said it was going to snow) and installing a fresh set of Energizer lithium’s I switched on the computer and sealed the box up. Then it was hung from the washing line in my back garden for the night.

I woke up in the morning to this :

So the weather report was spot on 🙂 According the on board temperature gauges it hit -2’C outside whilst the inside stayed stable at  7’C. However I suspect the sensors are reading 2’C warmer that it actual is as my more accurate thermometer read -4’C external. None the less it worked flawlessly for 18 hours in subzero temperatures. One thing I am going to change is the location where the antenna comes out, as you can see from the above picture it pulls the payload over with the weight.

CHDK Using SD Cards > 4Gb Using Only Windows

HOWTO Using a > 4Gb Card with CHKD on the Canon Cameras Under Windows
Apologies in advance for the wall of text.
As you will most probably have discovered Windows won’t let you format SD Cards with multiple partions so you can use the higher capacity SD Cards with your project. If anyone knows of a free open source utility that can partition SD Cards in Windows please let me know, I assume Gparted can do it (Live CD) and Ubuntu Live CD can also do this. However for this example I’m staying purely in Windows and Paragon Hard Disk Manager is the only product I’ve found will work with this. The via CHDK method doesn’t seem to work for me.
You need :
SD Card Reader that can handle the SHDC Cards
Approriate CHDK For your Camera both full and small versions (http://mighty-hoernsche.de/)
Paragon Hard Disc Manager
Instructions :

1/ Put your card in the reader and open Paragon Hard Disc Manager
2/ If there are any partitions on the card wipe them.
3/ Create a new partition size 32Mb, type FAT16, in the remaining space create a FAT32 partition to fill remaining space. Apply the changes.
If it says it needs a system restart just ignore it.
4/ Copy the contents of the small CHDK to the 32Mb partition.
5/ Run Card Tricks
6/ Select the partition and press make bootable.
7/ Remove the card from the reader, enable the write protect then put it in the camera.
8/ CHDK should boot up, press the printer button so you get <ALT> on the screen then menu.
9/ Navigate to Miscellanious stuff -> Swap Partitions and press Func Set.
10/ Take out of the camera, remove the write protect.
11/ Put back in the card reader
12/ You should now be able to see the larger partition
13/ Extract the full CHDK to this partition.
14/ Put write protect back on and put back in the camera.
15/ Put in play mode, wait for the lense to retract, press menu, under the play menu at the bottom hit firmware update, CHDK should now boot.
16/ Navigate to Miscellanious stuff -> Swap Partitions and press Func Set.
All done.
Making Pictures Viewable
1/ Press shutter button to stop the script.
2/ Press shutter again to get display back on
3/ Select Misc -> Swap Partitions
4/ Power Camera Off
Initiating CHDK Mode
1/ Enable Write Protect
2/ Boot camera in playback mode
3/ Press Menu, scroll to the bottom, select Firmware Update
4/ Put camera back in record mode.
5/ Press shutter button to stop the script.
6/ Press Menu
7/ Select Misc -> Swap Partitions
8/ Power Camera Off
9/ Power Camera On
Updated :
This method doesn’t seem to work for all the cameras, the swap partitions may be missing. If this is the case the following procedure from here . In case the original site goes down I’ll mirror it here :
To setup a bootable partition on an SDHC card and install CHDK
==============================================================
Make sure the following software is available in the same folder as this Instruction.txt…
CardTricks-144-SFX.exe (run to self-extract to this folder) available at:
http://savedonthe.net/download/78/CardTricks-144-SFX.exe
PartitionWizard_6.exe (run to install) available at:
http://download.cnet.com/Partition-Wizard-Home-Edition/3000-2094_4-10962200.html?part=dl-6285158&subj=dl&tag=button
MBRfix.zip (extract MBRfix.exe to this folder) available at:
http://www.sysint.no/products/Download/tabid/536/language/en-US/Default.aspx
Desired CHDK build/version for camera (in this case a Canon A720IS)
1. Low-level format card using camera to wipe card clean of any/all partitions
2. Put card in USB reader
3. Install and run Partition Wizard software
4. Delete the single, primary FAT32 partition on card (entire card formated as FAT32)
[note: PW does not perform actions until you click the Apply button]
5. Create new Primary 16 MB FAT partition (will be a FAT12 filesystem)
6. Format remaining unallocated space as a primary FAT32 partition (ignore warning re. windows
only able to see first partition, Process takes a minute or two).  Then quit PW
7. Run CardTricks
8. Select card (16 MB partition only thing visible/mounted)
9. Click “Make Bootable” button and quit CardTricks
10. Copy “DISKBOOT.BIN” file from chosen CHDK build to card
11. Determine what drive number the card reader is. (count the number of drives shown under Computer in Explorer…
for example: drive C: = 0, drive D: = 1, drive F: card reader = 2. If a disc is in your CD/DVD, then drive E: shows
up and becomes #2 which would make the card = 3)
12. In Explorer, shift-right click on folder containing this and all other associated software files
and select “Open command window here”)
13. type:  mbrfix /drive 2 /partition 1 setpartitiontype 0 (assuming card reader drive is #2 in Explorer’s list)
and quit CMD. This sets the 16 MB partition as unknown and thus invisible to Windows
14. Remove card from reader
15. Insert card into reader. Second, larger FAT32 partition now becomes visible (same drive letter)
16. Copy CHDK folder in CHDK zip file (if applicable) to the card
17. Create a new folder on card named “DCIM”
18. Create a new folder in /DCIM named “100CANON”
19. Remove card from reader
20. Lock the card
21. Put card in camera and turn on. Camera should boot up and show CHDK splash screen.
If camera says “Card Locked” then something above was not done correctly.  Repeat procedure carefully.

Update! Board’s Received! Boards Working!

Been a bit busy lately so not many updates. A brief summary is I designed some boards for the Flight Computer and sent them to Olimex to be made.

These have been returned and populated :

The GPS chip being surface mount is a nightmare to solder, after some solder bled beneath the contacts and  some messing with a solder rework station we were convinced we’d cooked the Invetek chip, however on power up it got a lock almost immediately and started transmitting it’s position! Woo !

Big thanks to Benny @ Nevis Computers for the assistance with the soldering.

Now I have the board I’m going to do some work on the payload canister to make it all fit in and sort the camera(s) out.

Payload Container

Working on the payload container today

Once it was all glued together

I’ve been quite specific to ensure the camera doesn’t move about, I’ve seen far too many pictures with half the picture obscured by the hole in the container! PCB and flight computer are at the other side of the container again fairly restricted on movement. There is a empty central channel which I may put a boom on for a video camera, maybe on flight 2 🙂

Finally some 1.5mm braided Nylon cord held in place with yet move lovely gaffer tape to complete the job.

Full set of pictures is at http://www.flickr.com/photos/avahab/sets/72157624924217198/