Author Archives: Anthony Stirk - Page 2

pAVA R9 takes a trip to Russia!

Although the new pAVA R9 board flew successfully on our glider record attempt (Here : http://ava.upuaut.net/?p=650) I decided it would be best to actually launch it under a balloon. With quite a bit of help (i.e he re-wrote it) from Phil Heron the code for the DominoEX was modified to transmit THOR16 (DominoEX extension with FEC, by Dave W1HKJ). I believe this is the first balloon to use it.

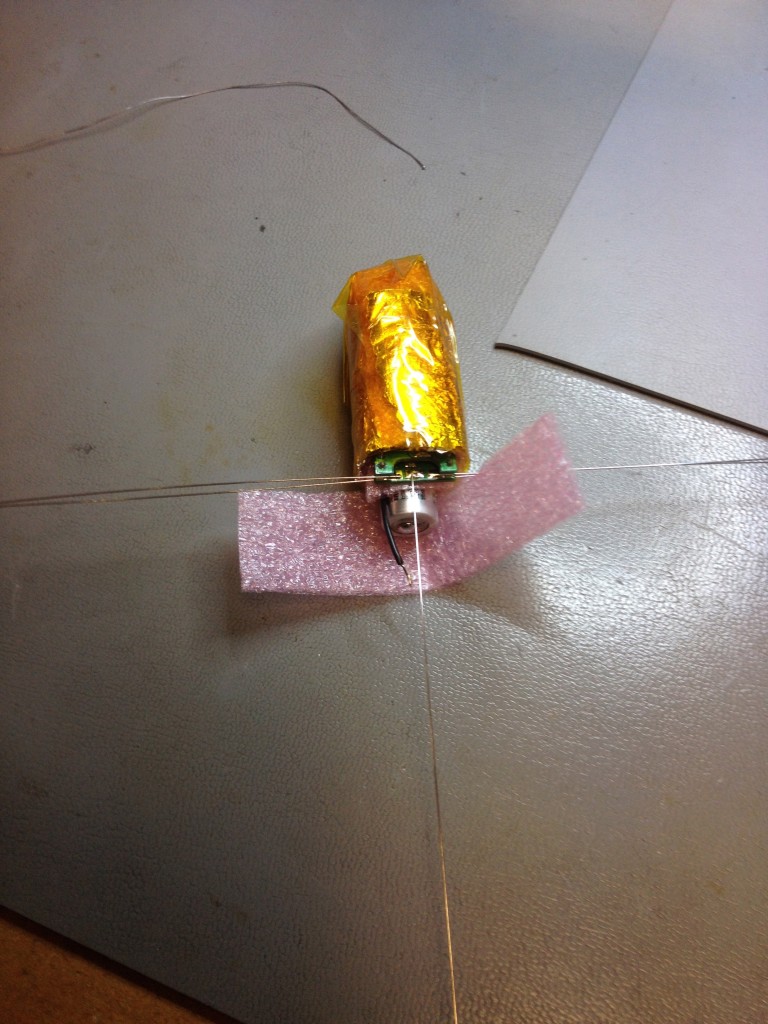
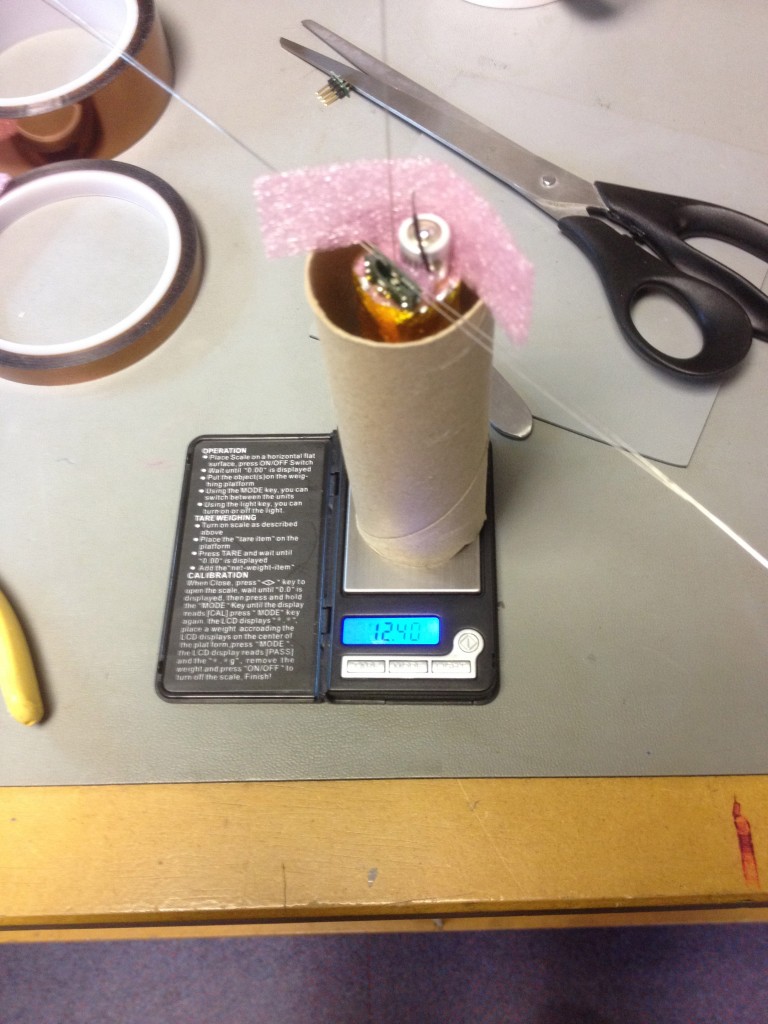
Error corrected telemetry plus the extremely stable radio should make for an easy payload to track. The weather hasn’t been exactly pico friendly recently but the winds looked great, fast and taking a swing by Poland (later turned out not to be the case). So I soldered some antennas on, a battery and wrapped the lot in “space insulation” (foam bag, Kitkat wrapper foil and Kapton tape) :

IMG_1589

I left the battery disconnected until just before launch. The tracker came in at 12.4g all in which is my lightest by far :

09 - aCwFImBThe weather on Saturday was very changeable. Initially I called the launch off but around lunch time the clouds cleared although the wind didn’t subside.The predicted path looked too good to waste so I took chance. With 1.5g of free lift the 36″ Qualatex balloon didn’t look inflated at all.

The battery was soldered on and attached to the balloon, the lot was thrown in the car and I drove up to my launch location close to home. It was extremely windy up there and the balloon was getting whacked about, rather than hold on to it I decided to just let it go and hope for the best.

Initially it rose up but then seemed to hold at an altitude, shortly afterwards I lost it visually jumped back in the car and drove home.

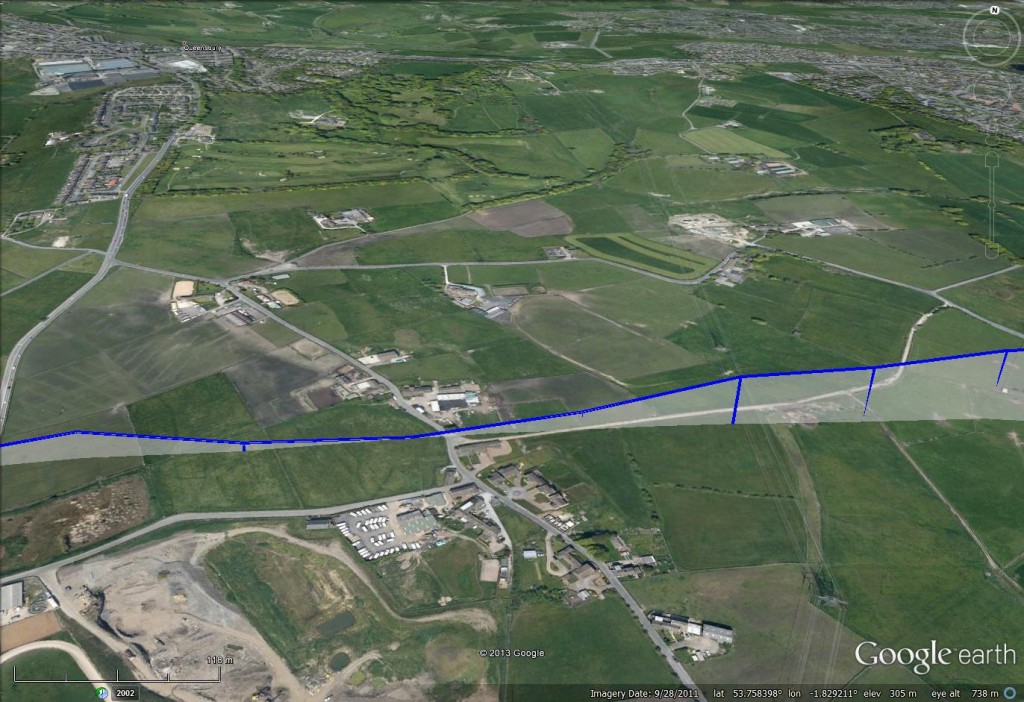
It was only when I got home I noticed just after launch it had dropped back down, possibly landed in a field, taken off again and missed the electricity pylons by meters :

10 - xoZe7U8I seem to be getting quite good at the “unintentionally sketchy launch”. The balloons ascent was interesting to say the least but up was up even if it did contain small amounts of down on the way.

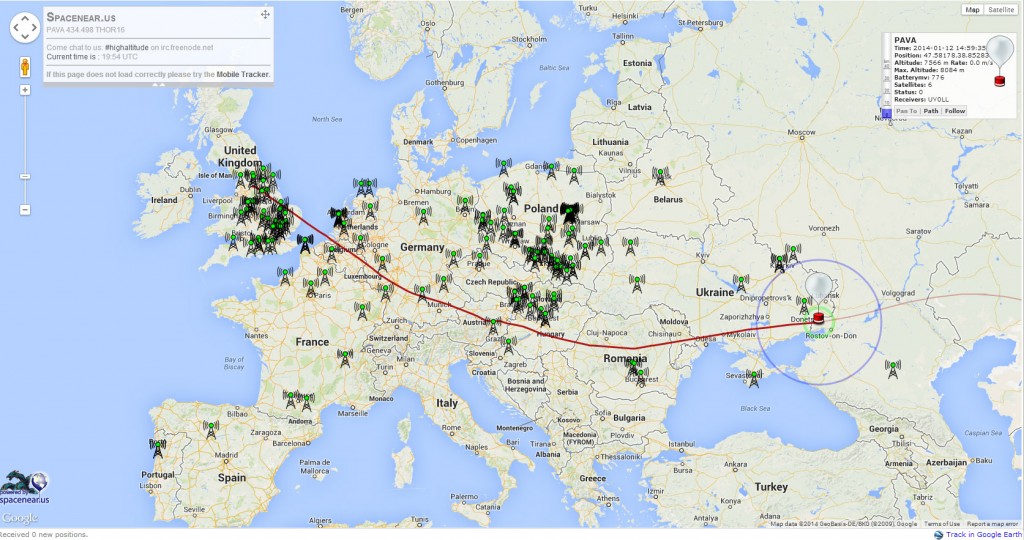
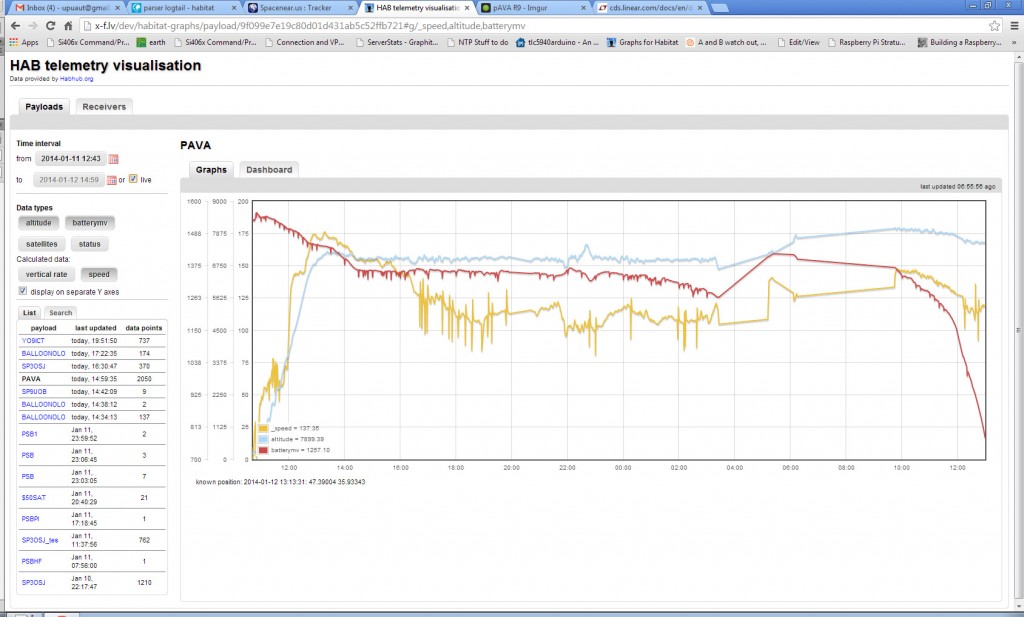
And off it went climbing up to about 7km where it entered a lovely float, the speed peaked at 175kmph (just over 100mph) as it sped towards Europe. Floating through the night over Germany I woke up on Sunday morning to find it had been tracked almost continuously through the night and was in Romania. Fortunately we managed to muster enough trackers to follow it all the way to the Ukraine where it was tracked by UR6ISU and UY0LL and as it entered southern Russia. Finally around 14:59UTC on Sunday the battery finally died at 7.5km just after entering Russia reporting a final battery voltage of 776mV, 8 satellites and situation normal. I have no reason to believe the balloon didn’t carry on through the night.

So covering an impressive greater circle distance of 2900km (3rd in the records) and averaging over 100kmph in 26 hours one could call this a successful test!

pava-12012014-3Battery data, speed and attitude over the flight (Thanks to x-f for this)
pava-12012014-1

As ever a huge thank you to all the regulars who take the time to track and  to the amateurs who responded to our calls for help on various forums and took the time to help out. It really is a great community.

New tracker pAVA R9

With the end of life notification for the RFM22B I have been working on a replacement for the pAVA R7 Tracker for a while now. I decided to get away from the RFM22B style modules as they didn’t offer very much flexibility and the quality can be dubious. I wanted to fit the RF chip with a TCXO to prevent drift at colder temperatures.

My initial stab at it pAVA R8 was fitted with a step up and had a number of faults with it :

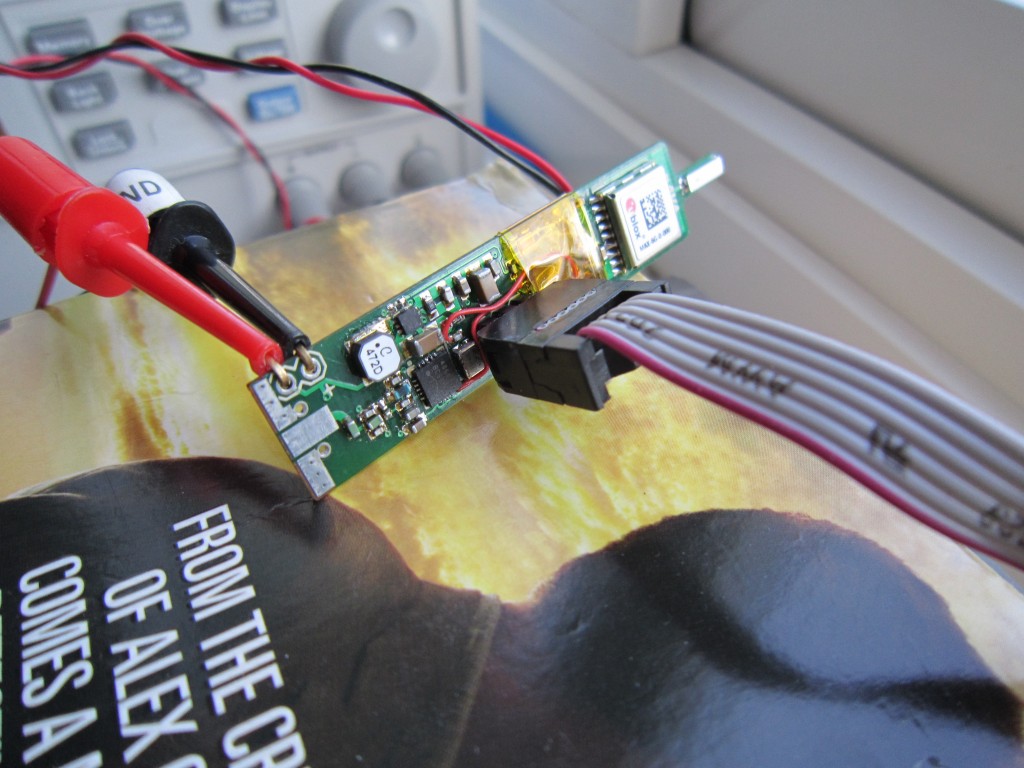
IMG_1939It tested a few new ideas I had. Firstly the AVR Crystal, I’ve not found very small crystals in 4Mhz or below so I fitted an extremely small 16Mhz crystal and set the fuses to DIV/8 so the AVR runs at 2Mhz and therefore within the specs for running at 1.8V. This worked, however the SI4060 circuit I’d missed a few critical wires off, the board was also a total pig to solder. In total I made two by hand. Fixes were applied using Kynar wire to fix the missing SI4060 connections.

With some assistance from Arko using some code KT5TK developed for the SI4464 the tracker code was re-written to work with the SI4060 radio. This turned out to be a great success. The tracker supplied a solid and stable RTTY. On the 10th of November I strapped it to the bottom of a 36″ foil and launched it. The tracker performed flawlessly, sadly the balloon didn’t and at 6km altitude the balloon burst and dropped the tracker near Ridington. Leo Bodnar drove up in the dark but the landing site was inaccessible, he got a few positions from the tracker which looked like it was in a tree. See the KML for flight path.

Taking what I’d learnt and some inspiration from Leo Bodnar, I redesigned the board. The 16Mhz crystal with the DIV/8 worked so that was kept. The SI4060 circuit worked, however I wanted to open up the more interesting data modes like DominoEX. Leo suggested even though it was totally out of spec a 16.369Mhz crystal would give a minimum step size on the SI4060 of (FCrystal/2^21) = 7.805Hz. The step size for DominoEX16 is 15.625Hz so 2 x step = 15.61Hz which is close enough (Thx to SP3OSJ for maths lesson!)

The bane of my life the ICSP programming header, after an off the cuff comment from Mark Jessop about snapping it off I came up with a design for a snap off ICSP header allowing easy programming with a standard header and then the ability to snap it off before launch.

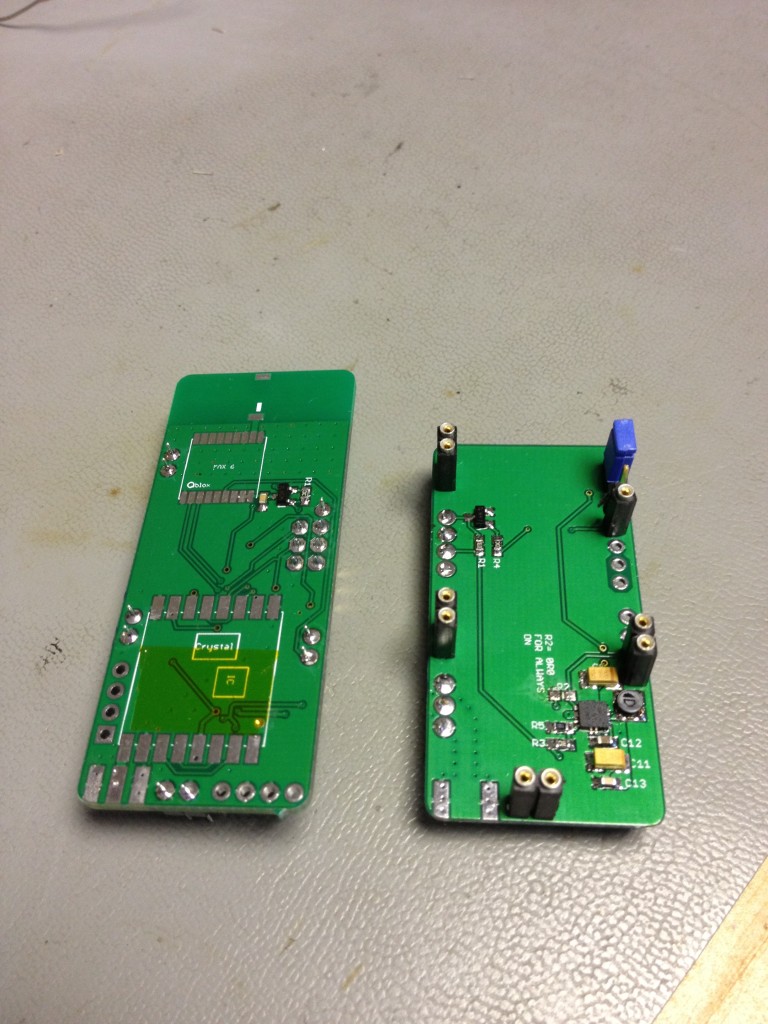
With Leo’s successful launches using solar I wanted to also give the board flexible power options, retaining my tried and tested LTC3526 step up but also having an option for solar + lipo power. Rather than sticking all this on one board I decided to mezzanine the power board onto the tracker board. So you can pick which power source the tracker uses.

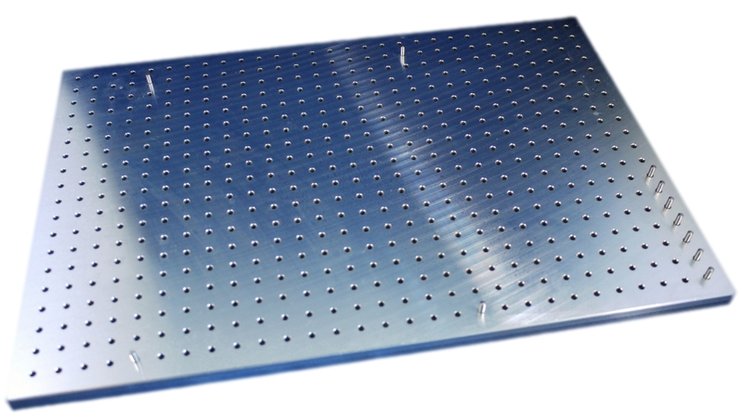
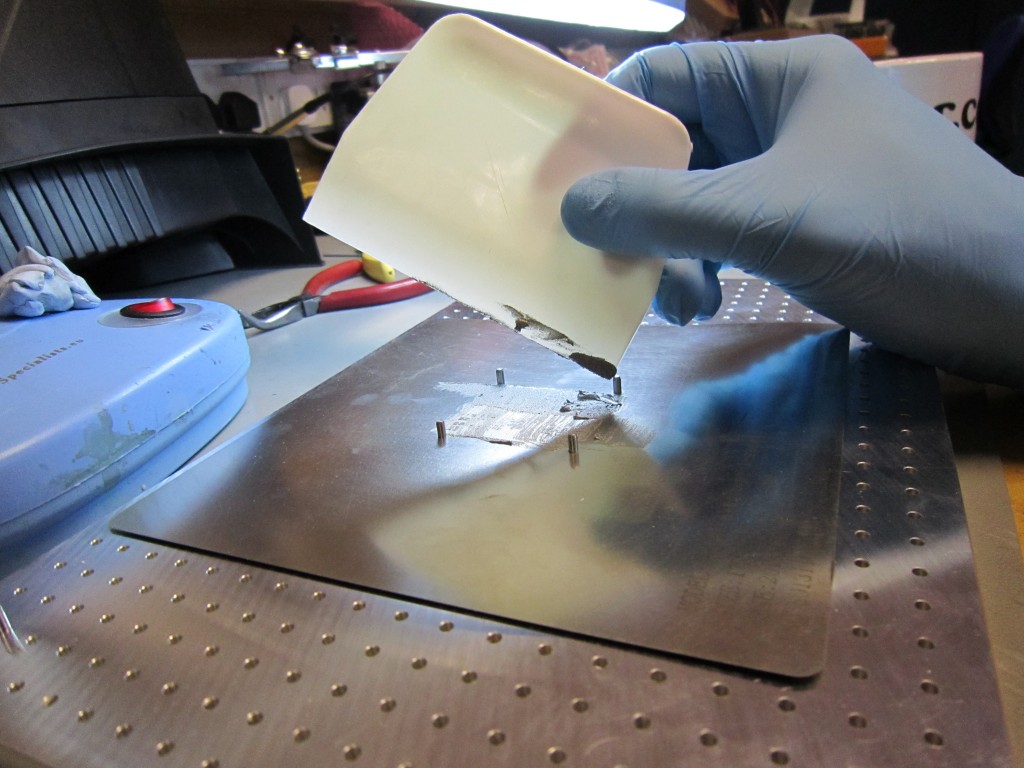
Finally I took the opportunity to try some new (to me) production techniques. Firstly I acquired a Stencil8 clone peg board from Arachnid Labs :

P1010379_clipped_rev_1.jpeg.743x418_q85_crop-smart_upscale

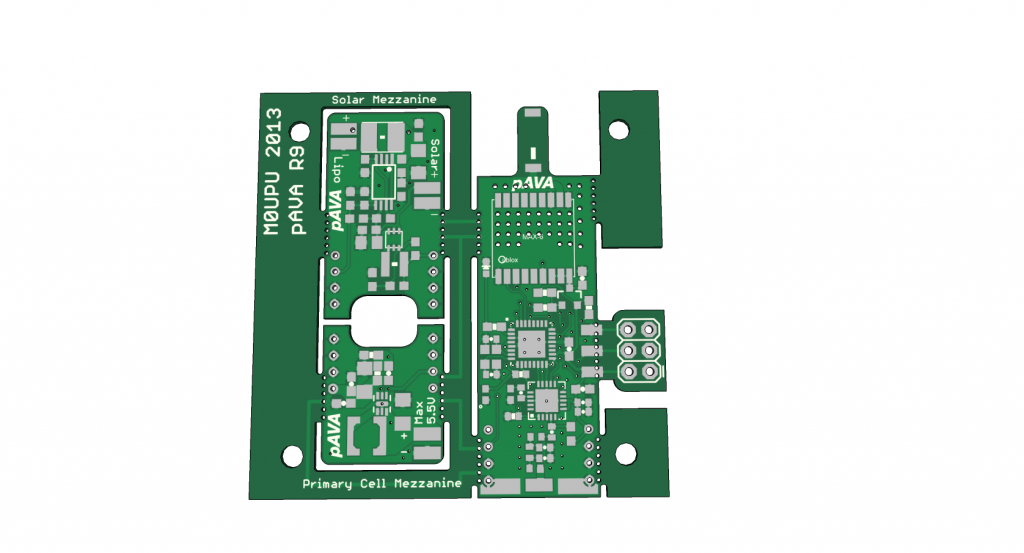
So I didn’t have to get three separate PCB’s made up I did my first “framed” board in Eagle with mouse bites to snap the individual boards out :

Untitled

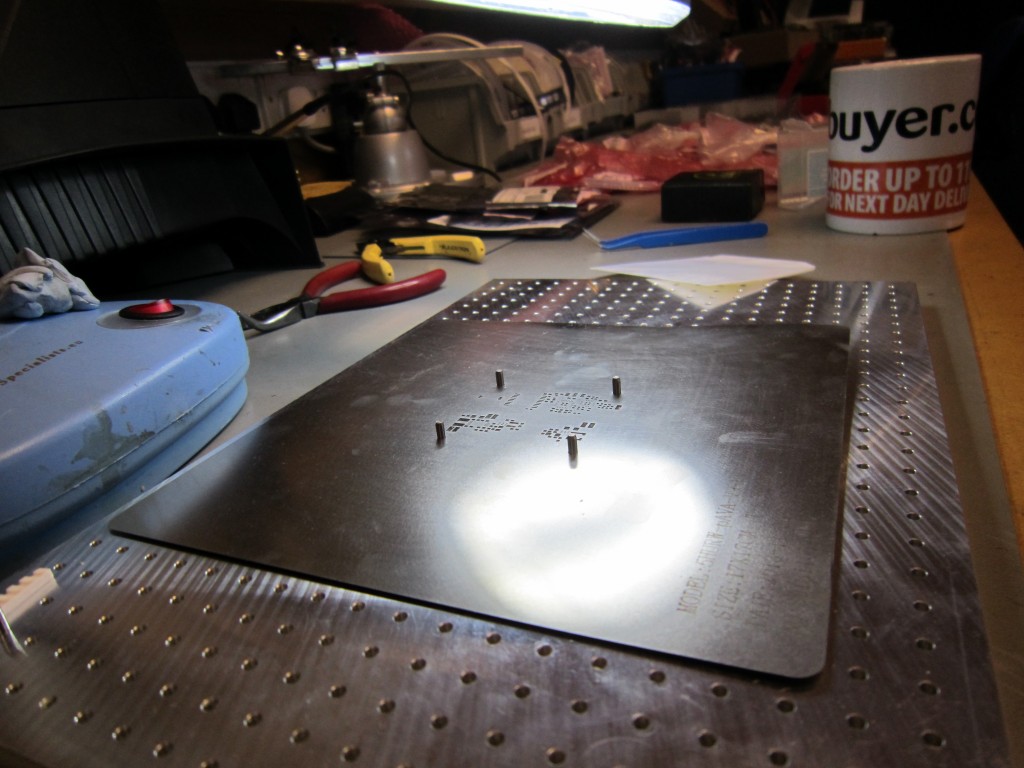
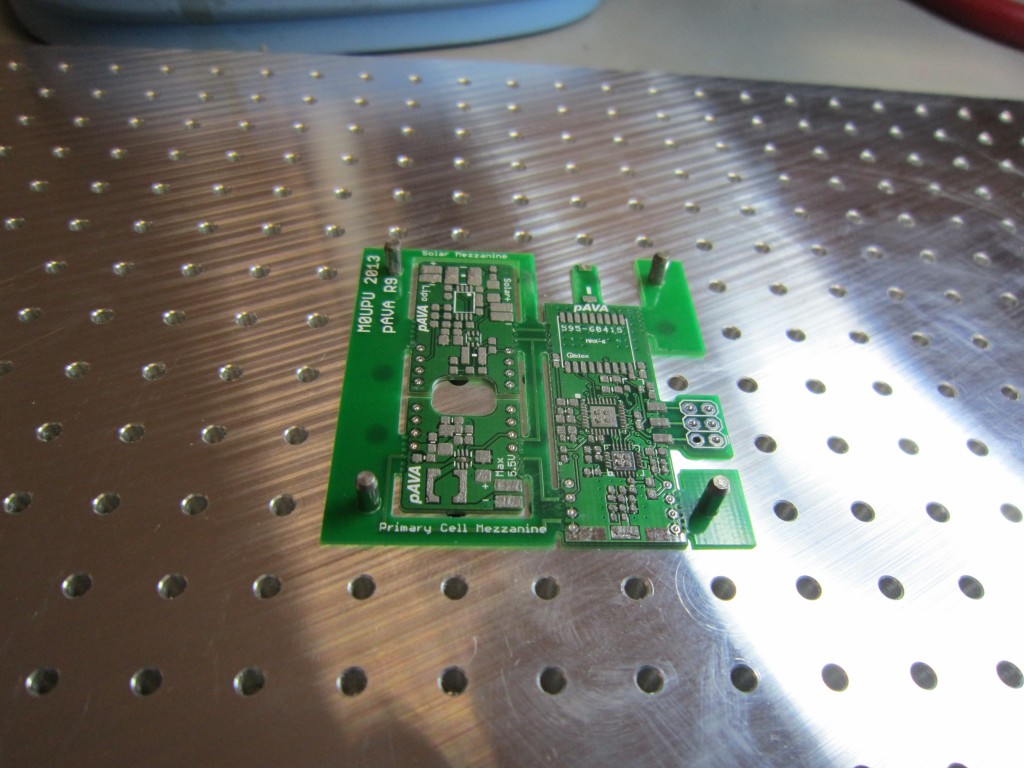
On the right is the tracker board, on the left bottom is the step up and left top is the Lipo + Solar board. Note snap off ICSP header. I ordered these from Hackvana.com along with a stencil which duly arrived :

2 - 1J6Bgql

5 - p3dsUx5 6 - Knz2Jwp 7 - RVsJ6Nc

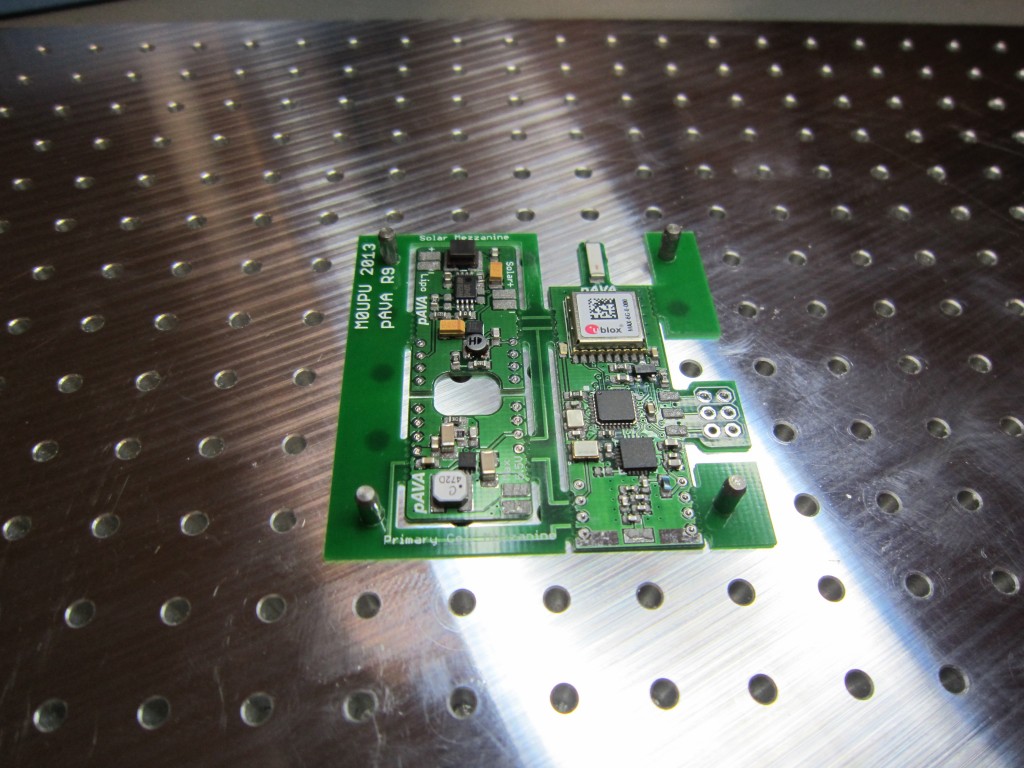
The finished result after spending 7 mins in a T962A Oven and snapped out :

01 - v3sg93U

02 - TBlz9Qc 03 - 0Vk3yAv

And with the step up power board installed on top.

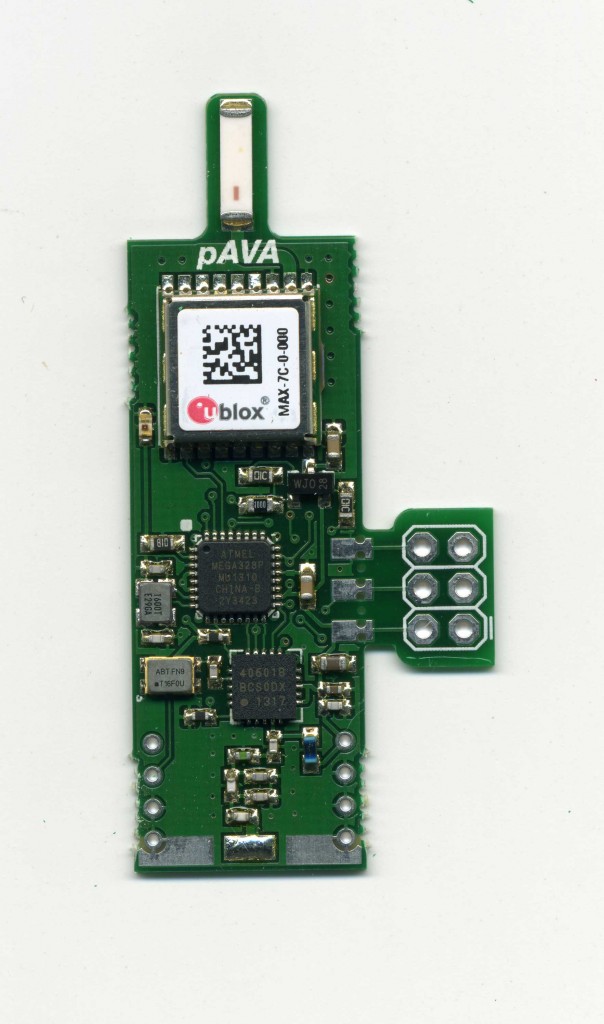
After a few initial false starts (solder had leaked down the snap of ICSP connector and shorted GND and VCC out, also I’d mounted the µC crystal incorrectly) the board was soon transmitting RTTY using the code developed on the R8 board.

Power consumption via the LTC3526 was quite impressive too. Using the MAX7C and 2Mhz AVR the board was, with the existing power saving code, using 30% less power than the previous board.  With a guitar string antenna and an AAA soldered in place I hung the board out in my back garden for a run test.

Weathering out a fairly nasty storm the board transmitted its new DominoEX16 code continuously for 28.5 hours before the battery gave out. This equates to over 70 hours from an AA. This is without any real power saving improvements over the code developed for the R7 board here : http://ava.upuaut.net/?p=437

Quite a big jump from 45 hours!

A new world record … possibly?

Edit : Daves write up here : http://www.daveakerman.com/?p=1469

Its been an interesting weekend in HABing, a huge number of flights over Europe. SP9UOB’s SEBA flight continues over the furthest reaches of Russia as I type this. Together with Dave Akerman we came up with a plan to do something a little interesting. There is a world record for the highest altitude paper plane by a certain Mr Haines of The Register. Lester has always been a fan of the balloon stuff and his existing record of 27km always seemed a little low to us High Altitude Ballooners.

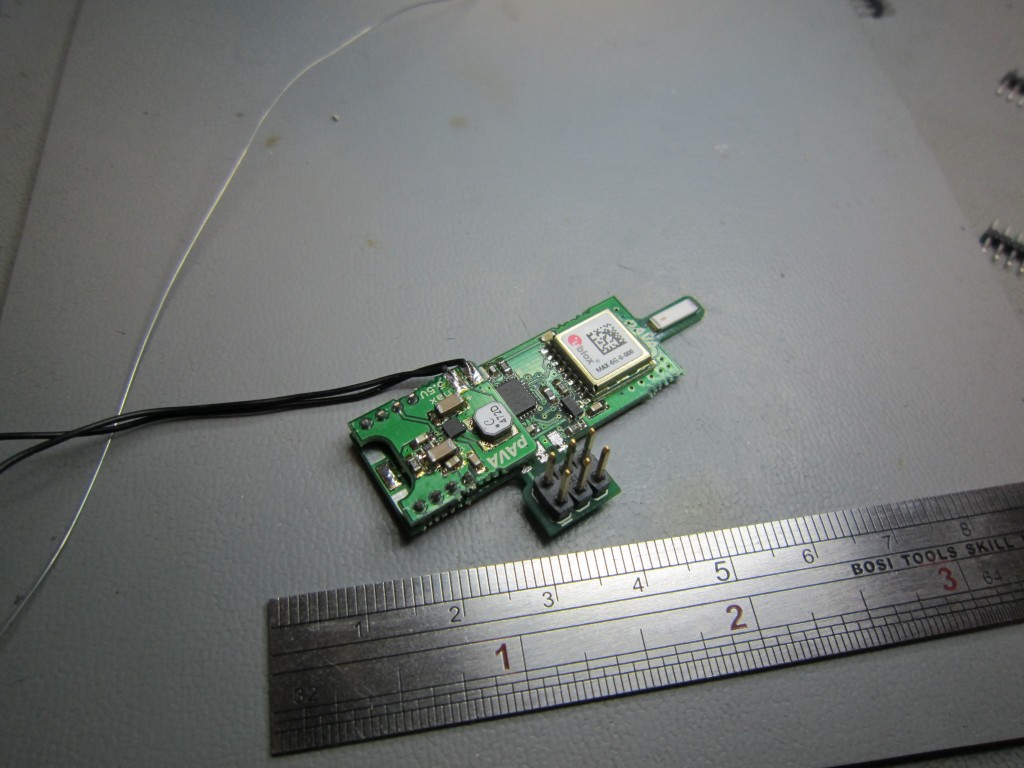
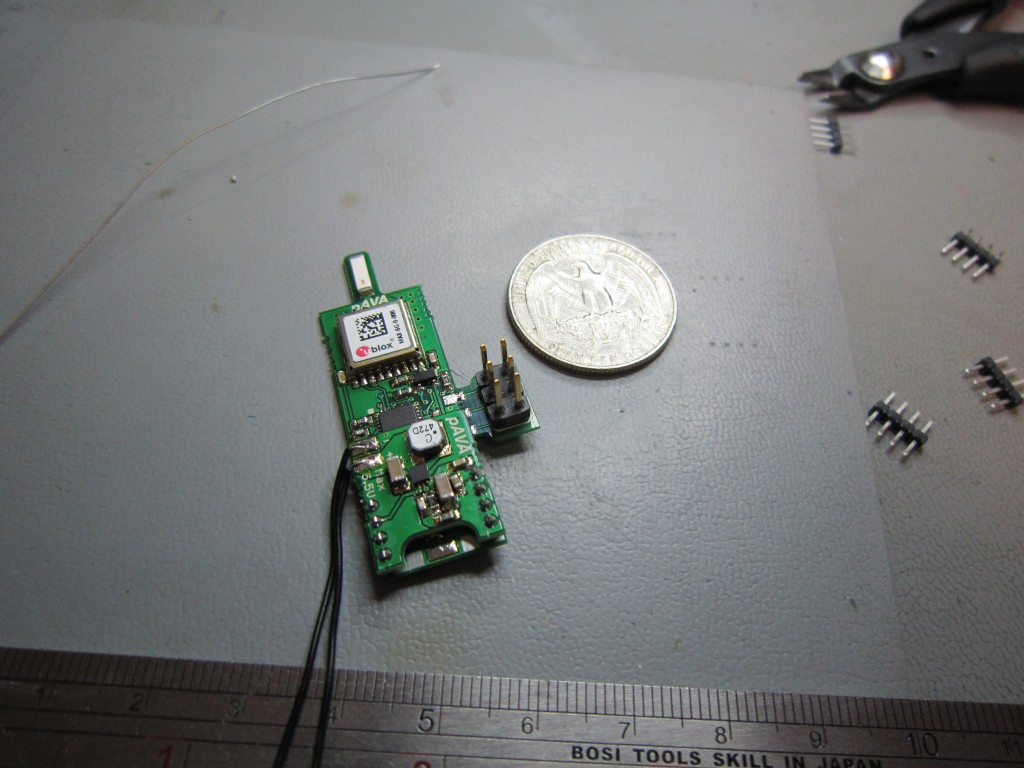
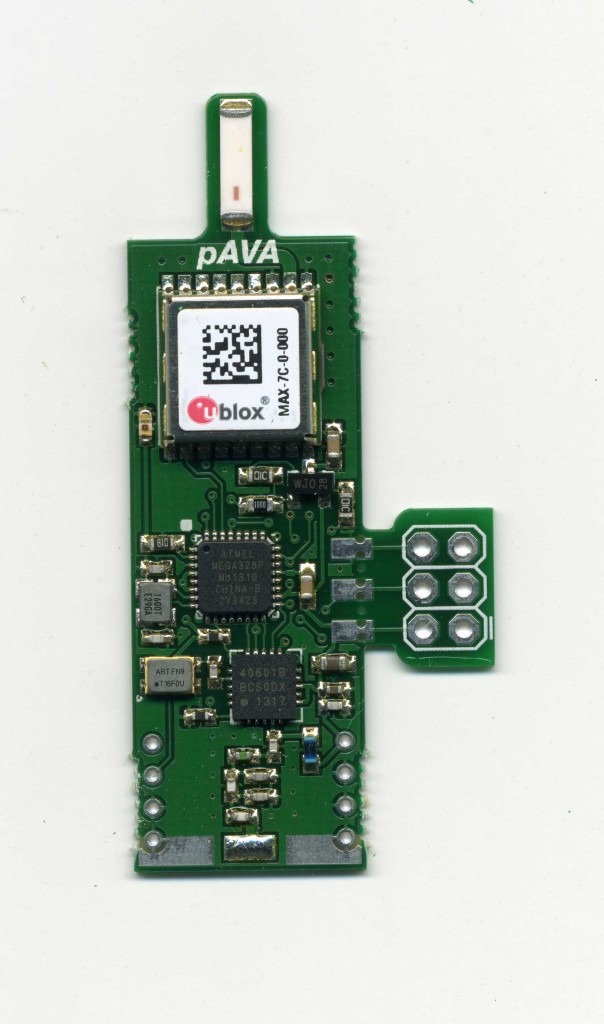
So after a brief conversation one evening we decided to have a pop at it. The tracker for the plane was my new pico board the PAVA R9. Featuring a ATMega328P-MU running at 2Mhz and a TCXO equipped SI4060 RF chip the tracker weighs in at a paltry 2g with antennas. Running from a step up board to 1.8V in theory it should run for 24 hours from an AAA battery :

Umh9OY9

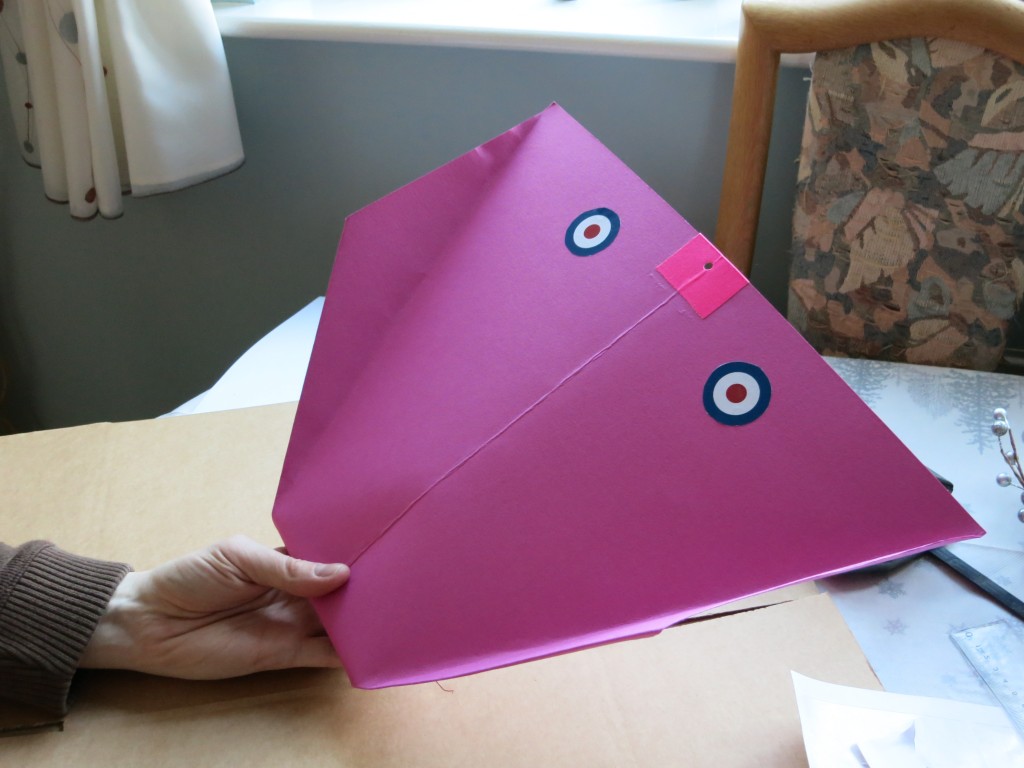
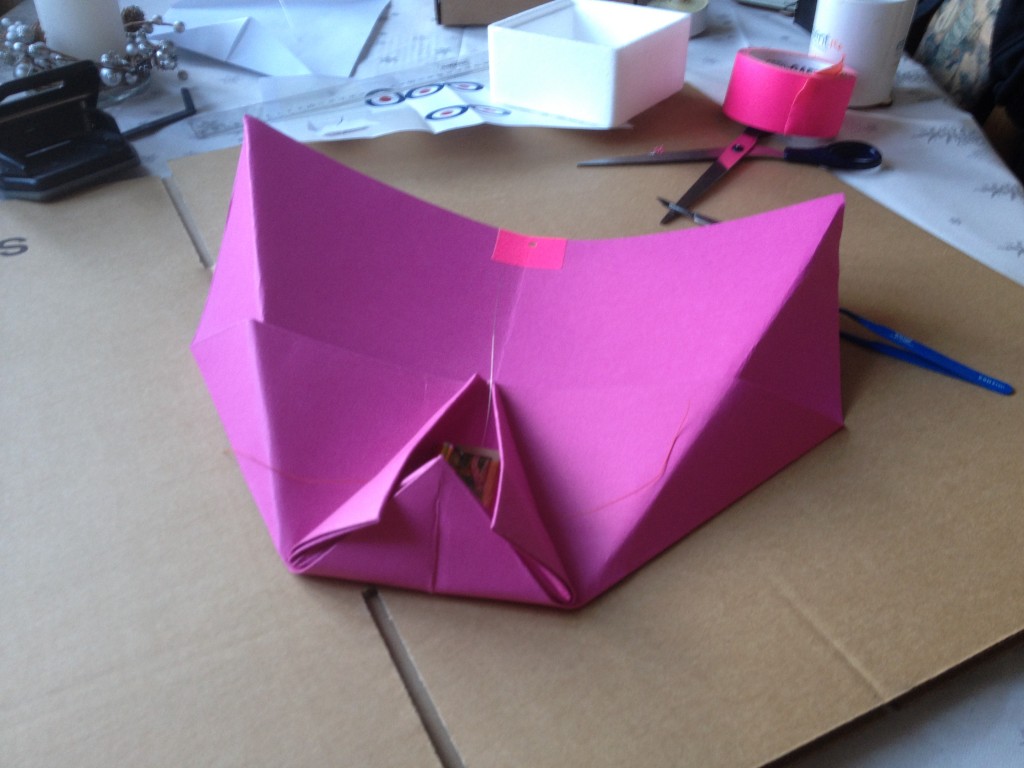
So the plan was simple make a paper plane, after some very brief bit of testing I opted for a a flying wing style plane which met my criteria of :
a) It sort of flies
b) no pointy bits
c) Somewhere to put the tracker

Dave kindly supplied some pink A1 Card which we cut into 2 A2 pieces to construct the plane. Liveries were added and trackers installed in the “nose cone” :

IMG_0144

IMG_1558

The tracker was sealed in with some obligatory pink gaffer tape and an cord attachment was put on the rear.

Mean while Dave made a Pi up in a box with some carbon fibre runners and resistive cut downs. The glider would rest on the runners and be held in place with a cord to be severed by the Pi at a predetermined altitude and location. As its technically not permitted to drop stuff over the UK without a parachute we opted for dropping the plane over the North Sea.

Originally we were going to fly two gliders but with the ground winds picking up we decided to leave one on the ground. Dave’s Pi was called CLOUDY and the plane was called SNOW. Additionally a 3rd tracker called WANNAB1 was attached above the Pi, however this tracker appeared to have a damaged antenna and didn’t work for the flight.

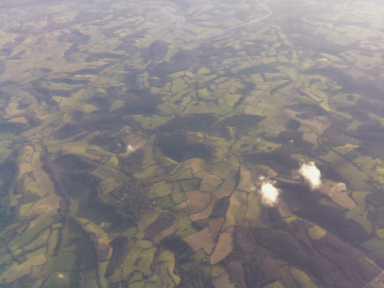
With the wind gusting judging the neck lift of the 1600g H2 filled balloon was sketchy at best. We aimed for 2m/s which we seemed to get on launch, more though luck than judgement. Climbing up into the sky other receivers around the UK and Europe started to receive the transmissions from both CLOUD and SNOW. CLOUD was transmitting SSDV images back, however the weight of the paper plane had pulled the payload downwards so we got some nice ground images :

2013-12-28--13-33-08-CLOUDY-7E42013-12-28--16-11-33-CLOUDY-807

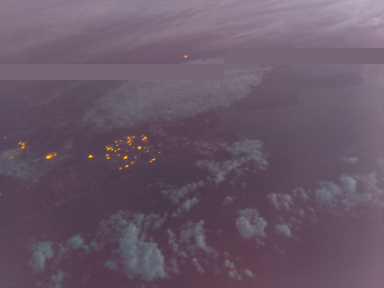
As the sun started to set Dave’s CLOUDY returned this wonderful image showing Venus above the sun setting below the horizon :

2013-12-28--16-44-33-CLOUDY-810

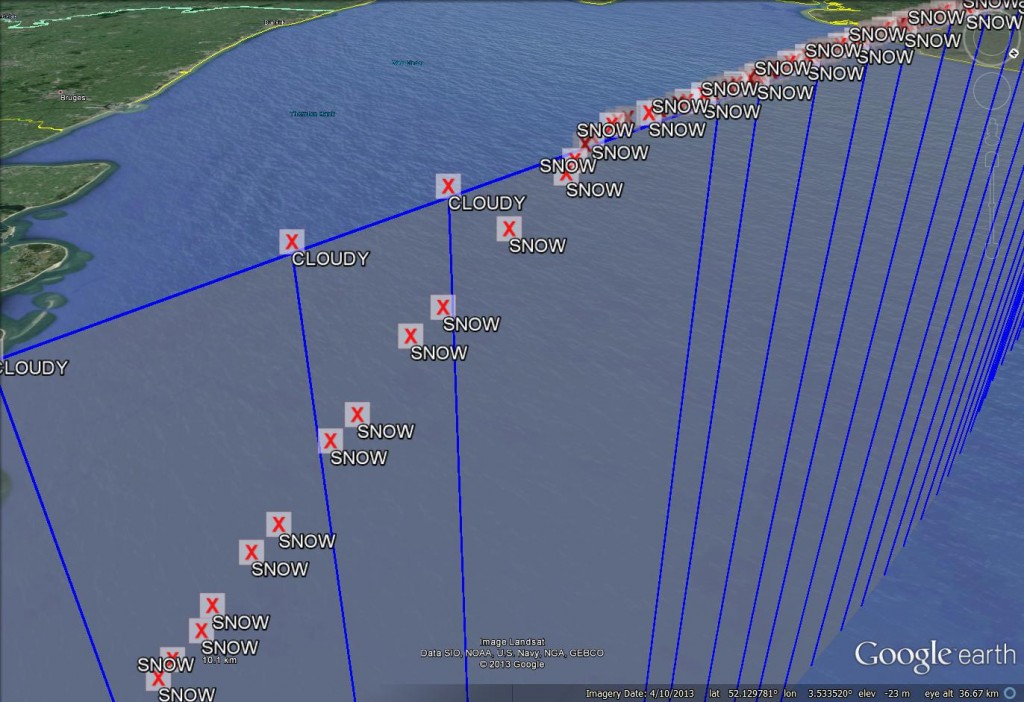
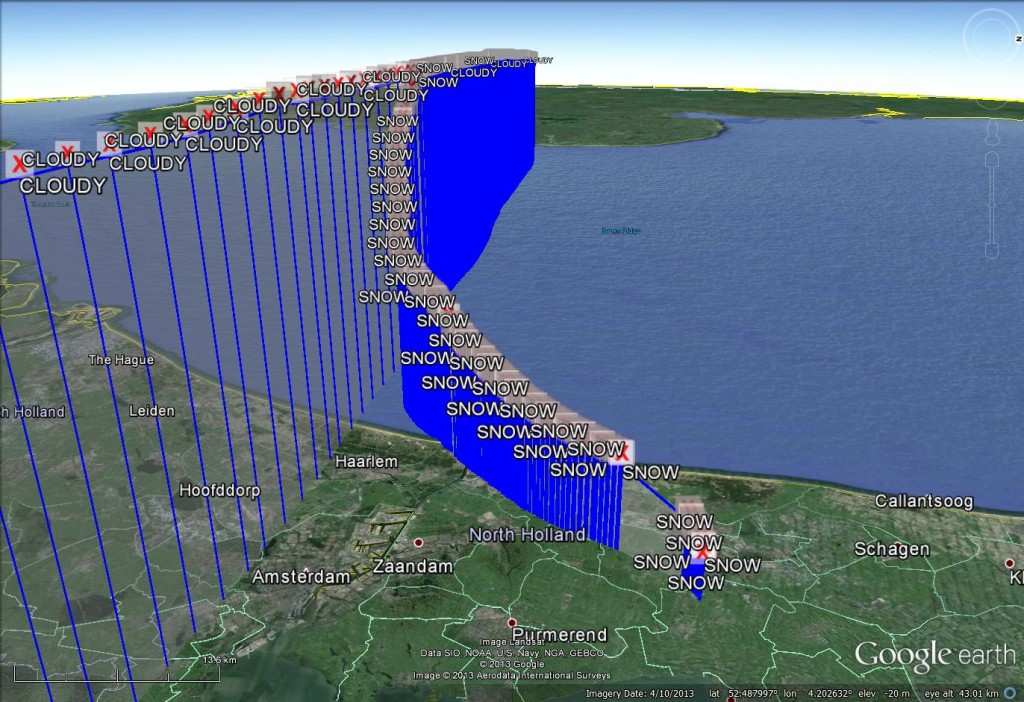
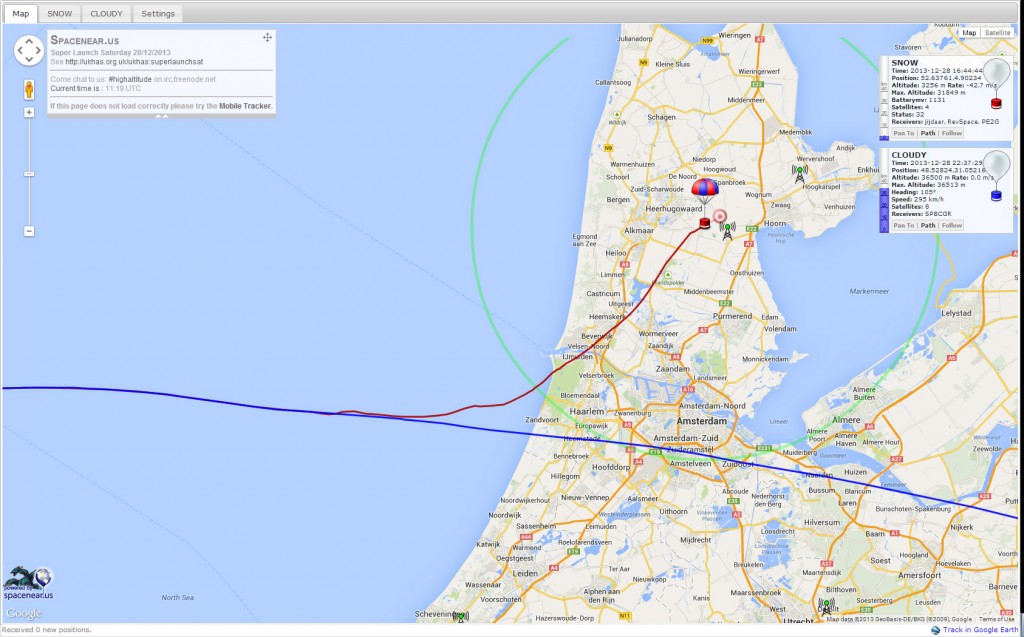
Both CLOUDY and SNOW continued climbing and entered the extremely fast winds at times touching 300kmph the balloon moved out of UK Airspace and towards Europe. At 16:14:21 as the balloon crossed longitude 4 and at 31849 meters altitude the Pi activated the FET that heated up the resistor and severed the connection between the paper plane and the balloon.

flight-6

SNOW began its initially rapid decent back towards Earth. It was obviously from the decent rate it was stalling, gliding, stalling but followed a fairly straight path down towards the Netherlands.

flight-4

flight-2

As its passed through the cold zone on the way down the GPS, which was not insulated particularly well probably dropped well below -50’C and stopped working. The radio continued transmitting however. The GPS did briefly pick up and returned some valid data around 3km altitude. Stations monitored it pretty much to the ground but it was just transmitting 0’s for location information. PD5DJ immediately went out to location it but was unable to pick up any signal. At this time the paper plane remains missing.

Edit : Wonderful 360′ of the flight path from Geoff Mather  : http://360.g8dhe.net/HAB_Flights/2013_Flights/Snow_20131228/Cloudy_and_Snow.html

CLOUDY continued onwards rebooting twice as it attempted to cut the non existent second plane and finally itself from the balloon. Probably due to cold causing a lack of volts the cut down over Poland of the Pi didn’t work and CLOUDY continued onwards to the Ukraine before its batteries gave out still in the air.

With a maximum altitude of 31849m this beats the previous world record of 27307m by a considerable amount. On behalf of Dave and I it will be submitted to the Guiness Book of World Records in the new year. Additionally as a side note the current paper plane distance record is about 260 feet, SNOW covered 63km in a straight line howwever I suspect we won’t be eligible for this record. Its certainly more than James May’s 26 miles attempt.

Thanks to all the trackers who help with this record attempt and to Dave, Leo and Julie. Cheers to Ara for assistance with the code. Raw data here :

CLOUDY CSV
SNOW CSV

Getting started with the NTX2B and the Arduino – Part 3 DominoEX

RTTY as discussed in Part 2 of these articles uses two tones a high and a low tone to convey the data. Whilst simple its performance can degrade as the signal gets weaker and with no error correction you may get packets with errors in them. To mitigate a little against this there is a more robust mode called DominoEX.

Note : This example should work with the original NTX2 but you may get significant drift as the temperature changes which will change the tone spacing and mean this doesn’t work . The NTX2B with its TCXO is more suitable.

DominoEX is an MFSK (Multiple frequency-shift keying) mode that uses 18 tones to transmit data, although there is no error correction built in the performance of DominoEX is such that its rarely needed. If you can hear the signal generally you can decode it. For a more in depth description please visit this page : http://www.qsl.net/zl1bpu/MFSK/DEX.htm

The key to DominoEX working is the distance between the tones has to be very precise. For DominoEX16 the baud rate has to be 15.625Hz. As you saw before our 8 bit Arduino doesn’t have the resolution to do this natively however we can increase the resolution of the Arduino by inserting a resistor between the Arduino pin 9 and the NTX2B TXD pin. The TXD pin has an internal 100k resistor so you’re making a voltage divider.

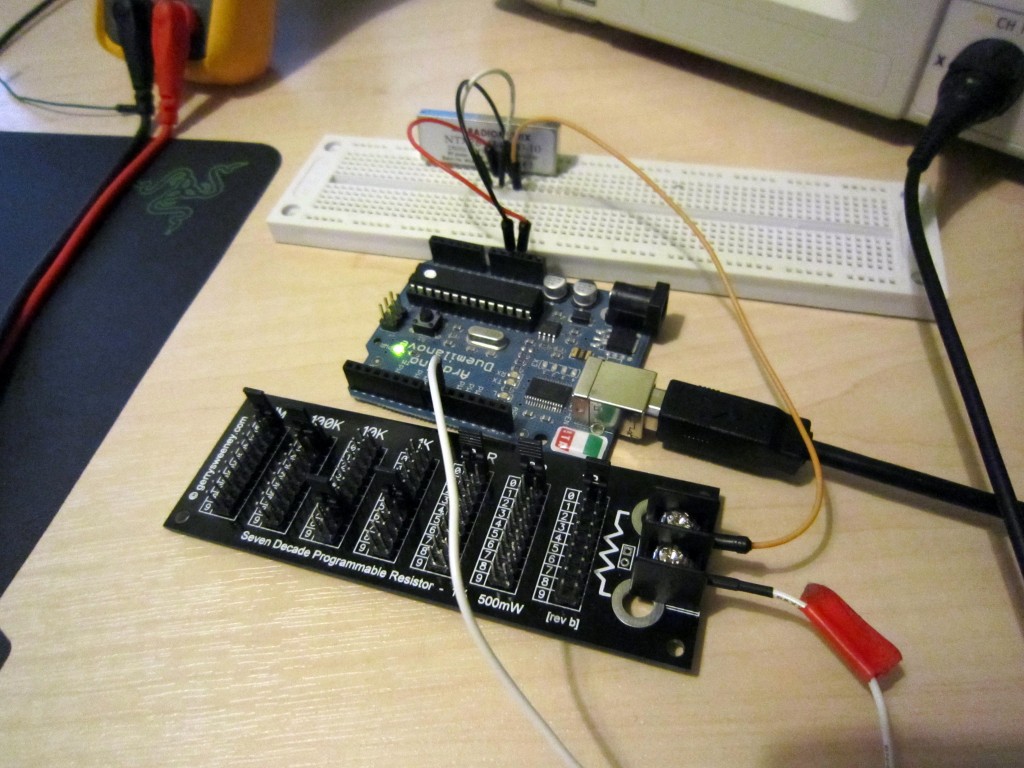
Using this method a 175k resistor means each PWM step gives the voltage needed to step the frequency up by the required amount. You may need to play with this to get the correct value. Here I’m using a Seven Decade Programmable resistor to test the values :
ntx2b-7
Code to test as follows :


/*
 Demo Code to Drive NTX2B via PWM
 DominoEX
 Written by Anthony Stirk M0UPU
 This example code is in the public domain.
 */

#define RADIOPIN 9

unsigned char varicode[][3] = {
 /* Primary alphabet */
 { 1,15, 9}, { 1,15,10}, { 1,15,11}, { 1,15,12}, { 1,15,13}, { 1,15,14}, { 1,15,15}, { 2, 8, 8},
 { 2,12, 0}, { 2, 8, 9}, { 2, 8,10}, { 2, 8,11}, { 2, 8,12}, { 2,13, 0}, { 2, 8,13}, { 2, 8,14},
 { 2, 8,15}, { 2, 9, 8}, { 2, 9, 9}, { 2, 9,10}, { 2, 9,11}, { 2, 9,12}, { 2, 9,13}, { 2, 9,14},
 { 2, 9,15}, { 2,10, 8}, { 2,10, 9}, { 2,10,10}, { 2,10,11}, { 2,10,12}, { 2,10,13}, { 2,10,14},
 { 0, 0, 0}, { 7,11, 0}, { 0, 8,14}, { 0,10,11}, { 0, 9,10}, { 0, 9, 9}, { 0, 8,15}, { 7,10, 0},
 { 0, 8,12}, { 0, 8,11}, { 0, 9,13}, { 0, 8, 8}, { 2,11, 0}, { 7,14, 0}, { 7,13, 0}, { 0, 8, 9},
 { 3,15, 0}, { 4,10, 0}, { 4,15, 0}, { 5, 9, 0}, { 6, 8, 0}, { 5,12, 0}, { 5,14, 0}, { 6,12, 0},
 { 6,11, 0}, { 6,14, 0}, { 0, 8,10}, { 0, 8,13}, { 0,10, 8}, { 7,15, 0}, { 0, 9,15}, { 7,12, 0},
 { 0, 9, 8}, { 3, 9, 0}, { 4,14, 0}, { 3,12, 0}, { 3,14, 0}, { 3, 8, 0}, { 4,12, 0}, { 5, 8, 0},
 { 5,10, 0}, { 3,10, 0}, { 7, 8, 0}, { 6,10, 0}, { 4,11, 0}, { 4, 8, 0}, { 4,13, 0}, { 3,11, 0},
 { 4, 9, 0}, { 6,15, 0}, { 3,13, 0}, { 2,15, 0}, { 2,14, 0}, { 5,11, 0}, { 6,13, 0}, { 5,13, 0},
 { 5,15, 0}, { 6, 9, 0}, { 7, 9, 0}, { 0,10,14}, { 0,10, 9}, { 0,10,15}, { 0,10,10}, { 0, 9,12},
 { 0, 9,11}, { 4, 0, 0}, { 1,11, 0}, { 0,12, 0}, { 0,11, 0}, { 1, 0, 0}, { 0,15, 0}, { 1, 9, 0},
 { 0,10, 0}, { 5, 0, 0}, { 2,10, 0}, { 1,14, 0}, { 0, 9, 0}, { 0,14, 0}, { 6, 0, 0}, { 3, 0, 0},
 { 1, 8, 0}, { 2, 8, 0}, { 7, 0, 0}, { 0, 8, 0}, { 2, 0, 0}, { 0,13, 0}, { 1,13, 0}, { 1,12, 0},
 { 1,15, 0}, { 1,10, 0}, { 2, 9, 0}, { 0,10,12}, { 0, 9,14}, { 0,10,12}, { 0,11, 8}, { 2,10,15},
 { 2,11, 8}, { 2,11, 9}, { 2,11,10}, { 2,11,11}, { 2,11,12}, { 2,11,13}, { 2,11,14}, { 2,11,15},
 { 2,12, 8}, { 2,12, 9}, { 2,12,10}, { 2,12,11}, { 2,12,12}, { 2,12,13}, { 2,12,14}, { 2,12,15},
 { 2,13, 8}, { 2,13, 9}, { 2,13,10}, { 2,13,11}, { 2,13,12}, { 2,13,13}, { 2,13,14}, { 2,13,15},
 { 2,14, 8}, { 2,14, 9}, { 2,14,10}, { 2,14,11}, { 2,14,12}, { 2,14,13}, { 2,14,14}, { 2,14,15},
 { 0,11, 9}, { 0,11,10}, { 0,11,11}, { 0,11,12}, { 0,11,13}, { 0,11,14}, { 0,11,15}, { 0,12, 8},
 { 0,12, 9}, { 0,12,10}, { 0,12,11}, { 0,12,12}, { 0,12,13}, { 0,12,14}, { 0,12,15}, { 0,13, 8},
 { 0,13, 9}, { 0,13,10}, { 0,13,11}, { 0,13,12}, { 0,13,13}, { 0,13,14}, { 0,13,15}, { 0,14, 8},
 { 0,14, 9}, { 0,14,10}, { 0,14,11}, { 0,14,12}, { 0,14,13}, { 0,14,14}, { 0,14,15}, { 0,15, 8},
 { 0,15, 9}, { 0,15,10}, { 0,15,11}, { 0,15,12}, { 0,15,13}, { 0,15,14}, { 0,15,15}, { 1, 8, 8},
 { 1, 8, 9}, { 1, 8,10}, { 1, 8,11}, { 1, 8,12}, { 1, 8,13}, { 1, 8,14}, { 1, 8,15}, { 1, 9, 8},
 { 1, 9, 9}, { 1, 9,10}, { 1, 9,11}, { 1, 9,12}, { 1, 9,13}, { 1, 9,14}, { 1, 9,15}, { 1,10, 8},
 { 1,10, 9}, { 1,10,10}, { 1,10,11}, { 1,10,12}, { 1,10,13}, { 1,10,14}, { 1,10,15}, { 1,11, 8},
 { 1,11, 9}, { 1,11,10}, { 1,11,11}, { 1,11,12}, { 1,11,13}, { 1,11,14}, { 1,11,15}, { 1,12, 8},
 { 1,12, 9}, { 1,12,10}, { 1,12,11}, { 1,12,12}, { 1,12,13}, { 1,12,14}, { 1,12,15}, { 1,13, 8},
 { 1,13, 9}, { 1,13,10}, { 1,13,11}, { 1,13,12}, { 1,13,13}, { 1,13,14}, { 1,13,15}, { 1,14, 8},
 { 1,14, 9}, { 1,14,10}, { 1,14,11}, { 1,14,12}, { 1,14,13}, { 1,14,14}, { 1,14,15}, { 1,15, 8},

/* Secondary alphabet */
 { 6,15, 9}, { 6,15,10}, { 6,15,11}, { 6,15,12}, { 6,15,13}, { 6,15,14}, { 6,15,15}, { 7, 8, 8},
 { 4,10,12}, { 7, 8, 9}, { 7, 8,10}, { 7, 8,11}, { 7, 8,12}, { 4,10,13}, { 7, 8,13}, { 7, 8,14},
 { 7, 8,15}, { 7, 9, 8}, { 7, 9, 9}, { 7, 9,10}, { 7, 9,11}, { 7, 9,12}, { 7, 9,13}, { 7, 9,14},
 { 7, 9,15}, { 7,10, 8}, { 7,10, 9}, { 7,10,10}, { 7,10,11}, { 7,10,12}, { 7,10,13}, { 7,10,14},
 { 3, 8, 8}, { 4,15,11}, { 5, 8,14}, { 5,10,11}, { 5, 9,10}, { 5, 9, 9}, { 5, 8,15}, { 4,15,10},
 { 5, 8,12}, { 5, 8,11}, { 5, 9,13}, { 5, 8, 8}, { 4,10,11}, { 4,15,14}, { 4,15,13}, { 5, 8, 9},
 { 4,11,15}, { 4,12,10}, { 4,12,15}, { 4,13, 9}, { 4,14, 8}, { 4,13,12}, { 4,13,14}, { 4,14,12},
 { 4,14,11}, { 4,14,14}, { 5, 8,10}, { 5, 8,13}, { 5,10, 8}, { 4,15,15}, { 5, 9,15}, { 4,15,12},
 { 5, 9, 8}, { 4,11, 9}, { 4,12,14}, { 4,11,12}, { 4,11,14}, { 4,11, 8}, { 4,12,12}, { 4,13, 8},
 { 4,13,10}, { 4,11,10}, { 4,15, 8}, { 4,14,10}, { 4,12,11}, { 4,12, 8}, { 4,12,13}, { 4,11,11},
 { 4,12, 9}, { 4,14,15}, { 4,11,13}, { 4,10,15}, { 4,10,14}, { 4,13,11}, { 4,14,13}, { 4,13,13},
 { 4,13,15}, { 4,14, 9}, { 4,15, 9}, { 5,10,14}, { 5,10, 9}, { 5,10,15}, { 5,10,10}, { 5, 9,12},
 { 5, 9,11}, { 3, 8,12}, { 4, 9,11}, { 4, 8,12}, { 4, 8,11}, { 3, 8, 9}, { 4, 8,15}, { 4, 9, 9},
 { 4, 8,10}, { 3, 8,13}, { 4,10,10}, { 4, 9,14}, { 4, 8, 9}, { 4, 8,14}, { 3, 8,14}, { 3, 8,11},
 { 4, 9, 8}, { 4,10, 8}, { 3, 8,15}, { 4, 8, 8}, { 3, 8,10}, { 4, 8,13}, { 4, 9,13}, { 4, 9,12},
 { 4, 9,15}, { 4, 9,10}, { 4,10, 9}, { 5,10,12}, { 5, 9,14}, { 5,10,12}, { 5,11, 8}, { 7,10,15},
 { 7,11, 8}, { 7,11, 9}, { 7,11,10}, { 7,11,11}, { 7,11,12}, { 7,11,13}, { 7,11,14}, { 7,11,15},
 { 7,12, 8}, { 7,12, 9}, { 7,12,10}, { 7,12,11}, { 7,12,12}, { 7,12,13}, { 7,12,14}, { 7,12,15},
 { 7,13, 8}, { 7,13, 9}, { 7,13,10}, { 7,13,11}, { 7,13,12}, { 7,13,13}, { 7,13,14}, { 7,13,15},
 { 7,14, 8}, { 7,14, 9}, { 7,14,10}, { 7,14,11}, { 7,14,12}, { 7,14,13}, { 7,14,14}, { 7,14,15},
 { 5,11, 9}, { 5,11,10}, { 5,11,11}, { 5,11,12}, { 5,11,13}, { 5,11,14}, { 5,11,15}, { 5,12, 8},
 { 5,12, 9}, { 5,12,10}, { 5,12,11}, { 5,12,12}, { 5,12,13}, { 5,12,14}, { 5,12,15}, { 5,13, 8},
 { 5,13, 9}, { 5,13,10}, { 5,13,11}, { 5,13,12}, { 5,13,13}, { 5,13,14}, { 5,13,15}, { 5,14, 8},
 { 5,14, 9}, { 5,14,10}, { 5,14,11}, { 5,14,12}, { 5,14,13}, { 5,14,14}, { 5,14,15}, { 5,15, 8},
 { 5,15, 9}, { 5,15,10}, { 5,15,11}, { 5,15,12}, { 5,15,13}, { 5,15,14}, { 5,15,15}, { 6, 8, 8},
 { 6, 8, 9}, { 6, 8,10}, { 6, 8,11}, { 6, 8,12}, { 6, 8,13}, { 6, 8,14}, { 6, 8,15}, { 6, 9, 8},
 { 6, 9, 9}, { 6, 9,10}, { 6, 9,11}, { 6, 9,12}, { 6, 9,13}, { 6, 9,14}, { 6, 9,15}, { 6,10, 8},
 { 6,10, 9}, { 6,10,10}, { 6,10,11}, { 6,10,12}, { 6,10,13}, { 6,10,14}, { 6,10,15}, { 6,11, 8},
 { 6,11, 9}, { 6,11,10}, { 6,11,11}, { 6,11,12}, { 6,11,13}, { 6,11,14}, { 6,11,15}, { 6,12, 8},
 { 6,12, 9}, { 6,12,10}, { 6,12,11}, { 6,12,12}, { 6,12,13}, { 6,12,14}, { 6,12,15}, { 6,13, 8},
 { 6,13, 9}, { 6,13,10}, { 6,13,11}, { 6,13,12}, { 6,13,13}, { 6,13,14}, { 6,13,15}, { 6,14, 8},
 { 6,14, 9}, { 6,14,10}, { 6,14,11}, { 6,14,12}, { 6,14,13}, { 6,14,14}, { 6,14,15}, { 6,15, 8},
};
uint8_t _sym = 0;

void setup() {
 pinMode(RADIOPIN, OUTPUT);
 setPwmFrequency(RADIOPIN, 1);
}

// the loop routine runs over and over again forever:
void loop() {
dominoex_string("M0UPU DOMINOEX TEST\n");

}
void dominoex_txsym(uint8_t sym)
{
 _sym = (_sym + 2 + sym) % 18;
 analogWrite(RADIOPIN, _sym);
 delay(64);
}
void dominoex_txchar(uint16_t vcode)
{
 uint8_t i, c;

 for(i = 0; i < 3; i++)
 {
 c = varicode[vcode][i];
 if(i && !(c & 0x8)) break;
 dominoex_txsym(c);
 }
}
void dominoex_string(char *s)
{
 for(; *s; s++) dominoex_txchar(*s);
}

void setPwmFrequency(int pin, int divisor) {
 byte mode;
 if(pin == 5 || pin == 6 || pin == 9 || pin == 10) {
 switch(divisor) {
 case 1:
 mode = 0x01;
 break;
 case 8:
 mode = 0x02;
 break;
 case 64:
 mode = 0x03;
 break;
 case 256:
 mode = 0x04;
 break;
 case 1024:
 mode = 0x05;
 break;
 default:
 return;
 }
 if(pin == 5 || pin == 6) {
 TCCR0B = TCCR0B & 0b11111000 | mode;
 }
 else {
 TCCR1B = TCCR1B & 0b11111000 | mode;
 }
 }
 else if(pin == 3 || pin == 11) {
 switch(divisor) {
 case 1:
 mode = 0x01;
 break;
 case 8:
 mode = 0x02;
 break;
 case 32:
 mode = 0x03;
 break;
 case 64:
 mode = 0x04;
 break;
 case 128:
 mode = 0x05;
 break;
 case 256:
 mode = 0x06;
 break;
 case 1024:
 mode = 0x7;
 break;
 default:
 return;
 }
 TCCR2B = TCCR2B & 0b11111000 | mode;
 }
}

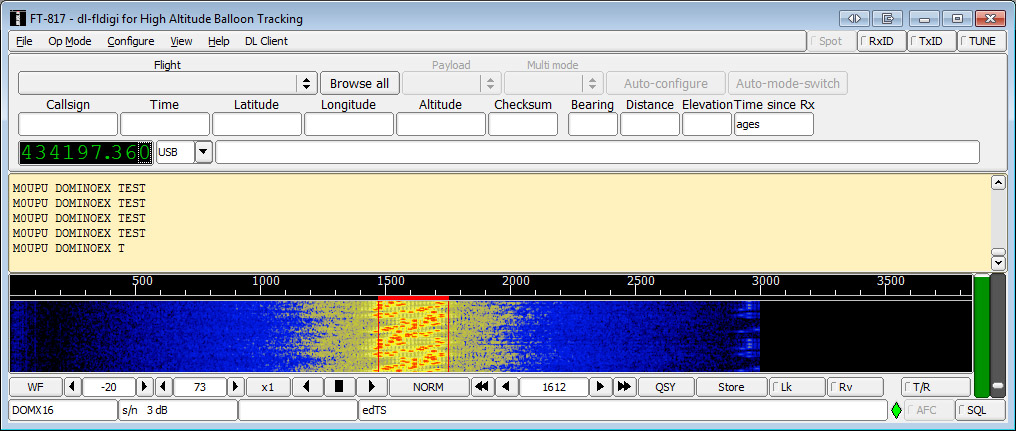
Viewed in DL-FLDIGI (Click Op Mode -> DominoEX -> DominoEX16)
ntx2b-8
You can adjust the code to do DominoEX22 by amending the delay line from 64 ( 1/Baud rate so for DominoEX16 = 0.064s, DominoEX22 = 1/21.533 = 0.0464) to 46 and adjusting the resistor to ~ 100k.

You can purchase the NTX2B at Hab Supplies here : http://ava.upuaut.net/store/index.php?route=product/product&path=71_63&product_id=92
Getting started with the NTX2B and the Arduino – Part 2 RTTY

In part 1 of this article I discussed linking the NTX2B to the Arduino and getting a high and low tone out of it. In this article we go one step further and turn this into a transmission of data.

Using the circuit discussed in the previous article upload the following code will transmit a short sentence at 50 baud, 7 bits ASCII 2 stop bits. Also the code adds a CRC checksum at the end of the data string.

The datastring variable is passed to a procedure called rtty_txtstring which takes care of transmitting the data by breaking it down into characters, then it transmits the individual bits of those characters. The key to getting the baud rate correct is the timing. Theoretically 50 baud should be 1/50th of a second = 20000µS however the Arduino delayMicroseconds command can only do a maximum delay of 16383µS. To get round this we do two delays of 10000µS.

300 baud after some playing seemed to be stable around 3370µS delay ( 300 baud should be 1/300s = 3333µS). You can uncomment the relevant lines out as needed.


/*
Demo Code to Drive NTX2B via PWM

 Written by Anthony Stirk M0UPU
 RTTY code from Rob Harrison Icarus Project.
 http://ukhas.org.uk
 This example code is in the public domain.
 */

#define RADIOPIN 9

#include <string.h>
#include <util/crc16.h>

char datastring[80];

void setup() {
 pinMode(RADIOPIN,OUTPUT);
 setPwmFrequency(RADIOPIN, 1);
}

void loop() {
 snprintf(datastring,80,"RTTY TEST BEACON RTTY TEST BEACON"); // Puts the text in the datastring
 unsigned int CHECKSUM = gps_CRC16_checksum(datastring); // Calculates the checksum for this datastring
 char checksum_str[6];
 sprintf(checksum_str, "*%04X\n", CHECKSUM);
 strcat(datastring,checksum_str);
 rtty_txstring (datastring);
}

void rtty_txstring (char * string)
{

/* Simple function to sent a char at a time to
 ** rtty_txbyte function.
 ** NB Each char is one byte (8 Bits)
 */

char c;

c = *string++;

while ( c != '\0')
 {
 rtty_txbyte (c);
 c = *string++;
 }
}
void rtty_txbyte (char c)
{
 /* Simple function to sent each bit of a char to
 ** rtty_txbit function.
 ** NB The bits are sent Least Significant Bit first
 **
 ** All chars should be preceded with a 0 and
 ** proceded with a 1. 0 = Start bit; 1 = Stop bit
 **
 */

int i;

rtty_txbit (0); // Start bit

// Send bits for for char LSB first

for (i=0;i<7;i++) // Change this here 7 or 8 for ASCII-7 / ASCII-8
 {
 if (c & 1) rtty_txbit(1);

else rtty_txbit(0);

c = c >> 1;

}

rtty_txbit (1); // Stop bit
 rtty_txbit (1); // Stop bit
}

void rtty_txbit (int bit)
{
 if (bit)
 {
 // high
 analogWrite(RADIOPIN,110);
 }
 else
 {
 // low
 analogWrite(RADIOPIN,100);

}

// delayMicroseconds(3370); // 300 baud
 delayMicroseconds(10000); // For 50 Baud uncomment this and the line below.
 delayMicroseconds(10150); // You can't do 20150 it just doesn't work as the
 // largest value that will produce an accurate delay is 16383
 // See : http://arduino.cc/en/Reference/DelayMicroseconds

}

uint16_t gps_CRC16_checksum (char *string)
{
 size_t i;
 uint16_t crc;
 uint8_t c;

crc = 0xFFFF;

// Calculate checksum ignoring the first two $s
 for (i = 2; i < strlen(string); i++)
 {
 c = string[i];
 crc = _crc_xmodem_update (crc, c);
 }

return crc;
}

void setPwmFrequency(int pin, int divisor) {
 byte mode;
 if(pin == 5 || pin == 6 || pin == 9 || pin == 10) {
 switch(divisor) {
 case 1:
 mode = 0x01;
 break;
 case 8:
 mode = 0x02;
 break;
 case 64:
 mode = 0x03;
 break;
 case 256:
 mode = 0x04;
 break;
 case 1024:
 mode = 0x05;
 break;
 default:
 return;
 }
 if(pin == 5 || pin == 6) {
 TCCR0B = TCCR0B & 0b11111000 | mode;
 }
 else {
 TCCR1B = TCCR1B & 0b11111000 | mode;
 }
 }
 else if(pin == 3 || pin == 11) {
 switch(divisor) {
 case 1:
 mode = 0x01;
 break;
 case 8:
 mode = 0x02;
 break;
 case 32:
 mode = 0x03;
 break;
 case 64:
 mode = 0x04;
 break;
 case 128:
 mode = 0x05;
 break;
 case 256:
 mode = 0x06;
 break;
 case 1024:
 mode = 0x7;
 break;
 default:
 return;
 }
 TCCR2B = TCCR2B & 0b11111000 | mode;
 }
}

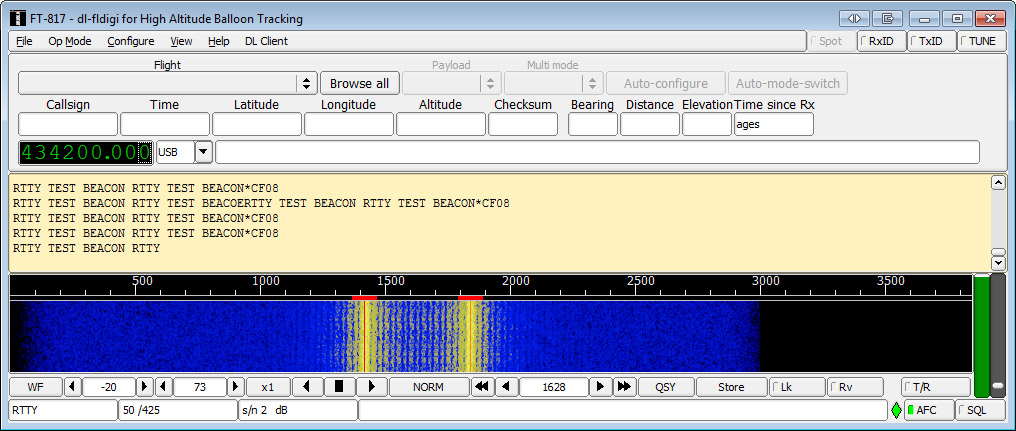
Load this up and you should hear the distinctive warble of RTTY coming out of your radio. Route this audio into DL-FLDIGI and you should see the bars in the center of the waterfall like this :

ntx2b-6
In DL-FLDIGI click Op Mode -> RTTY ->Custom.
Set carrier shift to 425, baud to 50, 7 bits per character, no parity and 2 stop bits. If everything is ok you should see DL-FLDIGI decoding the RTTY.

Part 3 discusses using a similar method transmit DominoEX.

Getting started with the NTX2B and the Arduino – Part 1 The Basics

A while ago now I wrote an article for the UKHAS website on linking an NTX2 to the Arduino. This tutorial, available here : http://ukhas.org.uk/guides:linkingarduinotontx2 is still valid however there are other ways to modulate the NTX2 or the NTX2B to get RTTY.

In part 1 of this article I’ll discuss using PWM to generate the required voltages to modulate the NTX2B, the physical wiring, how to test it and sample code. Part 2 will extend this to transmitting RTTY and finally part 3 will discuss using this to transmit DominoEX.

Please follow this entire article the basic code allows you to demonstrate step by step that your circuit is working.

Introduction

Getting your Arduino to transmit via the radio initially may seem daunting but its actually pretty simple. Please freely substitute the word “Arduino” for any micro-controller you wish to use. The example below works for 5V and 3.3V micro-controllers.

Please read this :

This may be the first bit of code you’ve come across with regards to creating a radio tracker. There is always the temptation to cut and paste it and away you go. And in isolation this may work. However should you then cut and paste further code without understanding what is going you will end up with an unworkable mess and something that is next to impossible for us to assist you with. Please take the time to work out what the code below is doing, redo it yourself, break it, fix it most importantly understand it.

Theory

You adjust the voltage on the NTX2’s TXD pin which adjusts its transmission frequency slightly. The difference in this frequency is called the shift. By doing this in a controlled fashion you can transmit 1’s and 0’s and therefore transmit meaningful data.

The NTX2 is a FM (Frequency Modulation) module intended to have a voltage applied to the TXD pin of between 0 and 3 volts. This voltage range changes the output frequency of the module by about 6KHz (i.e for a 434.200Mhz module 0V on TXD = 434.195Mhz and 3V on TXD = 434.202Mhz.

This means for each 1Hz change in frequency you need to change the voltage by 0.0005v (3 divided 6000) so to get a shift of 500hz you need to toggle the voltage applied to the TXD pin by 425×0.0005=0.2125v.

To get this voltage shift we are going to use PWM (Pulse Width Modulation). See this article for more information on PWM : http://arduino.cc/en/Tutorial/PWM. The resolution of this is 8 bits which means the Arduino can change the voltage by 256 (2^8) steps. This means the maximum voltage of 5V can be broken into 5/256 steps or  0.0195v per step. The maximum input of the NTX2B is 3V therefore there is no point applying voltages of greater than 3V. As a decimal this means 3/5* 256 = 153.

In theory the standard shift of 425Hz equates to a 0.2125/0.0195 = 11, however in reality on an NTX2B a value of 10 gave a perfect 425Hz shift. Don’t get too hung up on getting the exact shift, any shift from 350-500Hz is fine.

Items Required

Radiometrix NTX2B
Arduino or similar micro-controller

Circuit Diagram

ntx2b
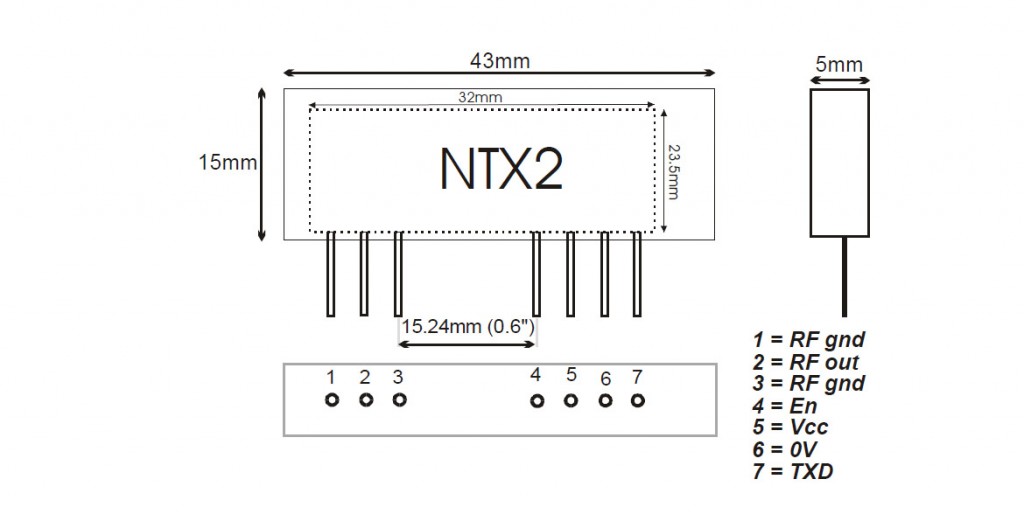
Connect Arduino 5V to the NTX2B VCC pin 5
Connect Arduino 5V to the NTX2B EN pin 4
Connect Arduino GND to the NTX2B GND pin 6
Connect Arduino pin 9 to the NTX2B TXD pin 7

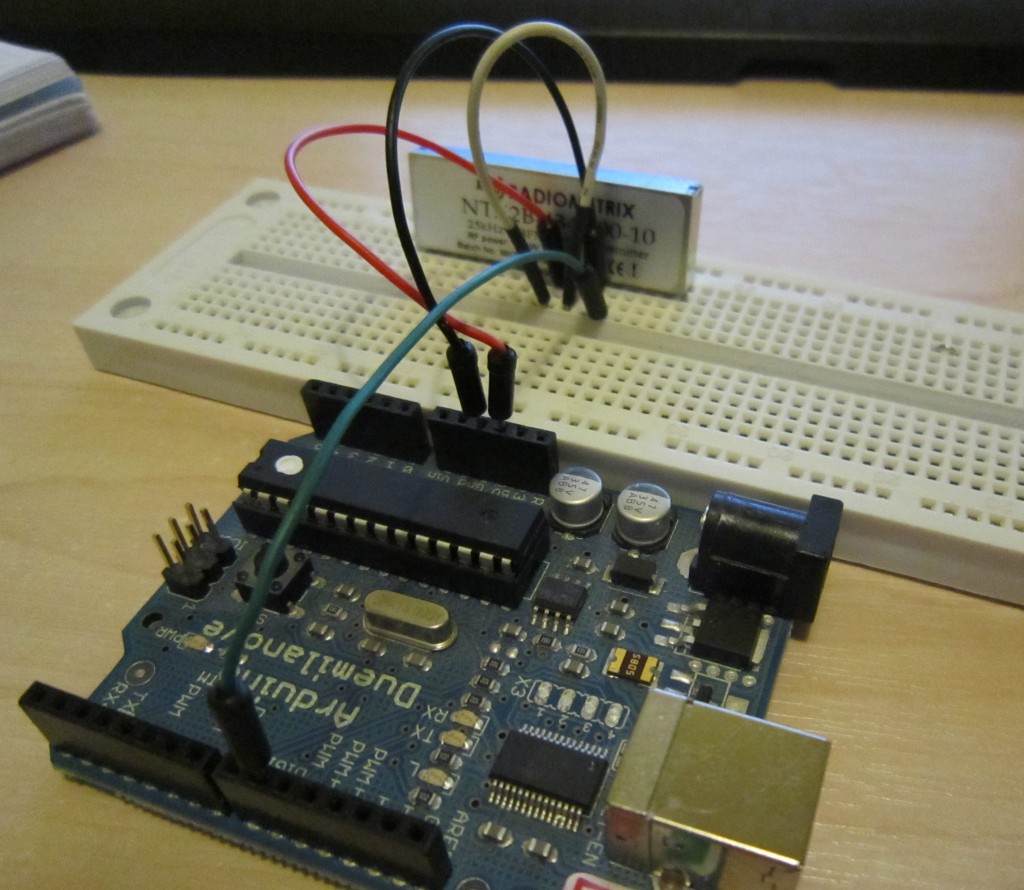
Once done it should look like this (you don’t need an antenna in at this point) :
ntx2b-2

The Code

The code is similar to the Fade example built into Arduino (File->Examples->03.Analogue->Fade)


/*
 Demo Code to Drive NTX2B via PWM

 Written by Anthony Stirk M0UPU

 This example code is in the public domain.
 */

#define RADIOPIN 9

void setup() {
 pinMode(RADIOPIN, OUTPUT);
 setPwmFrequency(RADIOPIN, 1);
}

void loop() {
 analogWrite(RADIOPIN,100);
 delay(500);
 analogWrite(RADIOPIN,110);
 delay(500);
}
void setPwmFrequency(int pin, int divisor) {
 byte mode;
 if(pin == 5 || pin == 6 || pin == 9 || pin == 10) {
 switch(divisor) {
 case 1:
 mode = 0x01;
 break;
 case 8:
 mode = 0x02;
 break;
 case 64:
 mode = 0x03;
 break;
 case 256:
 mode = 0x04;
 break;
 case 1024:
 mode = 0x05;
 break;
 default:
 return;
 }
 if(pin == 5 || pin == 6) {
 TCCR0B = TCCR0B & 0b11111000 | mode;
 }
 else {
 TCCR1B = TCCR1B & 0b11111000 | mode;
 }
 }
 else if(pin == 3 || pin == 11) {
 switch(divisor) {
 case 1:
 mode = 0x01;
 break;
 case 8:
 mode = 0x02;
 break;
 case 32:
 mode = 0x03;
 break;
 case 64:
 mode = 0x04;
 break;
 case 128:
 mode = 0x05;
 break;
 case 256:
 mode = 0x06;
 break;
 case 1024:
 mode = 0x7;
 break;
 default:
 return;
 }
 TCCR2B = TCCR2B & 0b11111000 | mode;
 }
}

Excluding the setPwmFrequency procedure (all this does is set the PWM speed as quick as it will go to made the voltage presented to the NTX2B PWM pin as more “analogue”) this code simply opens pin 9. It then alternates the voltage on this pin by 10 every 1/2 second. You can plug an LED into pin 9 to see what its doing.

Load this code up to the Arduino.

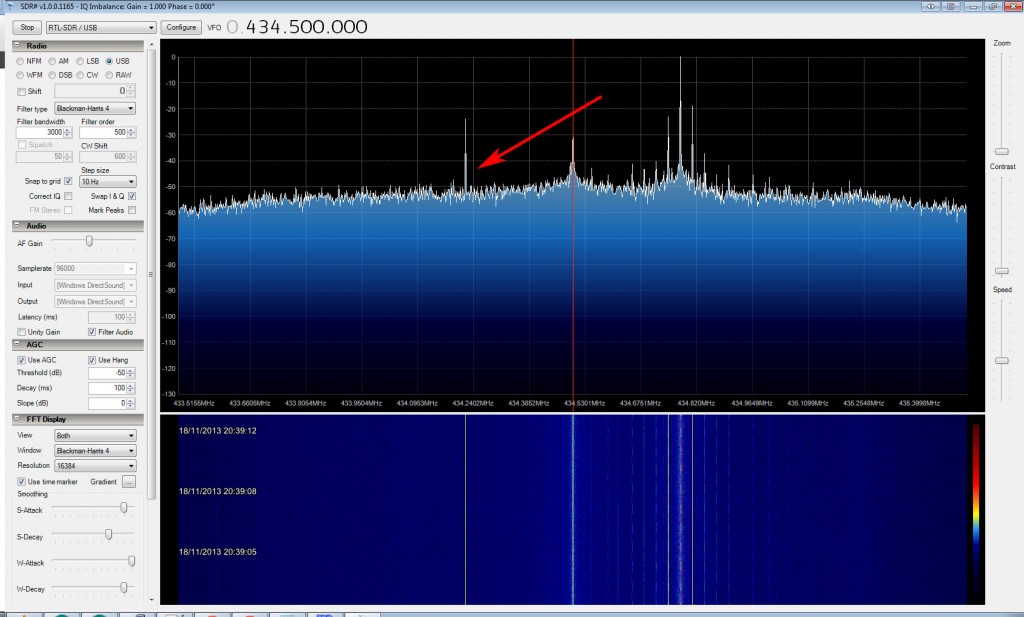
Ok now take your radio and tune it into the frequency of the NTX2B module. You should hear the high and low tones. If you’re using an RTL + SDR# set the frequency to something above the frequency of the module, i.e in this example our NTX2B is transmitting on 434.200Mhz so I’ve set SDR# to 434.500Mhz. You can see a peak on the left of the spectrum analyzer at the top around 434.200Mhz :

ntx2b-4
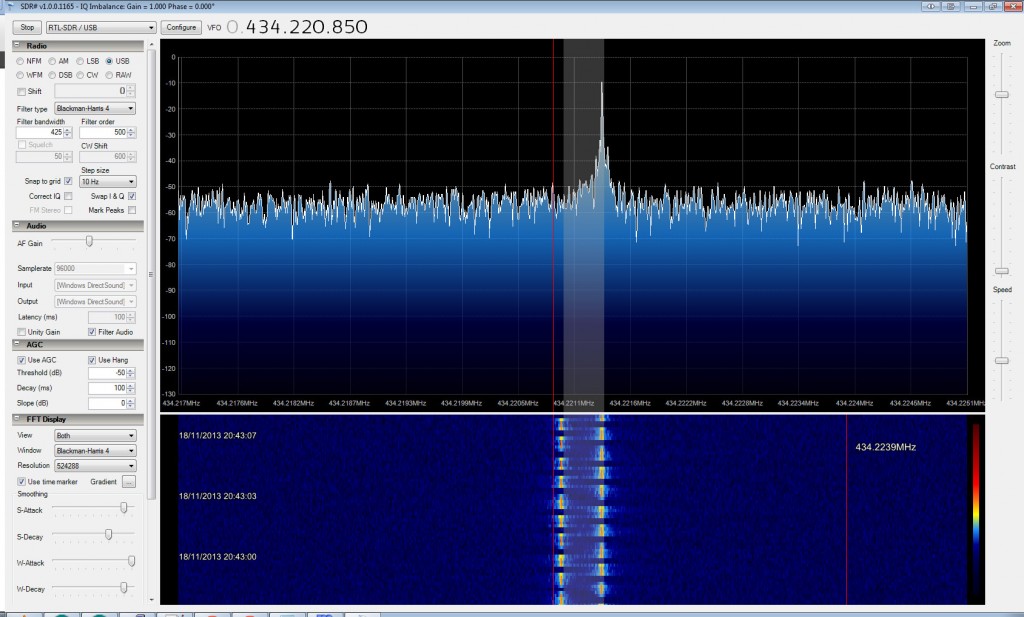
If you’re unsure if this is the radio, turn it off. It will disappear. Zoom in the line using the zoom on the right. You may want to increase the resolution in the FFT Display at this point, with a resolution of 262144 you should see some distinct high and low tones separated by about 425hz :

ntx2b-5

Congratulations you’re transmitting. If you’re ever unsure if your radio is working you should step back to this extremely simple code to check the basic operation. Now move to part 2 of this article to transmit some meaningful data : http://ava.upuaut.net/?p=627

5 minute guide to making an GPS synchronised NTP Server based on a Pi


Superseded by this http://ava.upuaut.net/?p=726

These instructions no longer work please review the article above.


EDIT : I’ve confirmed the version of NTP provided in the Open Chaos download below isn’t susceptible to the DRDoS / Amplification Attack using ntpdc monlist command discussed here : http://web.nvd.nist.gov/view/vuln/detail?vulnId=CVE-2013-5211

Working in IT I’m aware of how keeping accurate time is important, generally most of the time we will point our devices / equipment at uk.pool.ntp.org however there may be situations where a local time source is preferable. This can be for a number of reasons,  where no internet is available, radio amateur’s doing meteor scatter etc.

David Taylor from Satsignal.eu has done a comprehensive write up of getting the Pi to work as a Stratum-1 NTP Server. Taking this work Hauke Lampe has created an image with all the hard work done. With no compiling to be done its possible to get a Pi working with as a Stratum 1 NTP Server in less than five mins.

First you need a Raspberry Pi GPS Addon board available at Hab Supplies. Secondly you need a patch antenna (see related products). Thirdly get the minimal SD-card image based on Raspberry Pi’s Raspbian “wheezy” distribution featuring PPS-enabled kernel and ntpd by Hauke here :

http://ntpi.openchaos.org/downloads/

Pop the image on an SD Card. Plug in the antenna and the GPS board and power on the Pi.

Thats it really it will boot up and work as an NTP Server.

ntpi-2

I run the following commands as well :

sudo apt-get update
sudo apt-get install raspi-config (Use Raspi-config to resize fs)
sudo apt-get upgrade
sudo apt-get install gpsd-clients

Please be aware if there is a new kernel it may over write the Kernel with PPS support in it. You can from here install SNMP, monitoring as per Davids page here : http://www.satsignal.eu/ntp/Raspberry-Pi-NTP.html

A nice cheap very accurate time server for less than £100!

NTPi – Raspberry Pi as a Stratum-1 NTP Server Hardware Part 2

Having had a chat with a number of people about my previous LEA based NTPi board here http://ava.upuaut.net/?p=581 a few things were apparent. Firstly designing a board to fit a Pi you’ve removed the composite header from was silly and not checking it on a stock Pi the board results in it not fitting. Secondly the LEA based board is probably more complex that most people need for a Pi based NTP server.

The new positioning modules from Ublox the MAX-7 series are cost effective high performance and provide the PPS output needed for accurate time keeping. I set about designing a simpler board around the MAX-7Q module.

The MAX-7Q positioning module features a RTC Crystal, very low power usage and high performance. Although not a true timing module it is more than adequate for a Pi based NTP Server. Its worth noting the module can, with a serial command, be placed in “Stationary” dynamic mode which is the default mode for the much more expensive timing modules.

Also of note is the PPS output can be, again with serial commands, be increased to an output of up to 10Mhz for other applications.

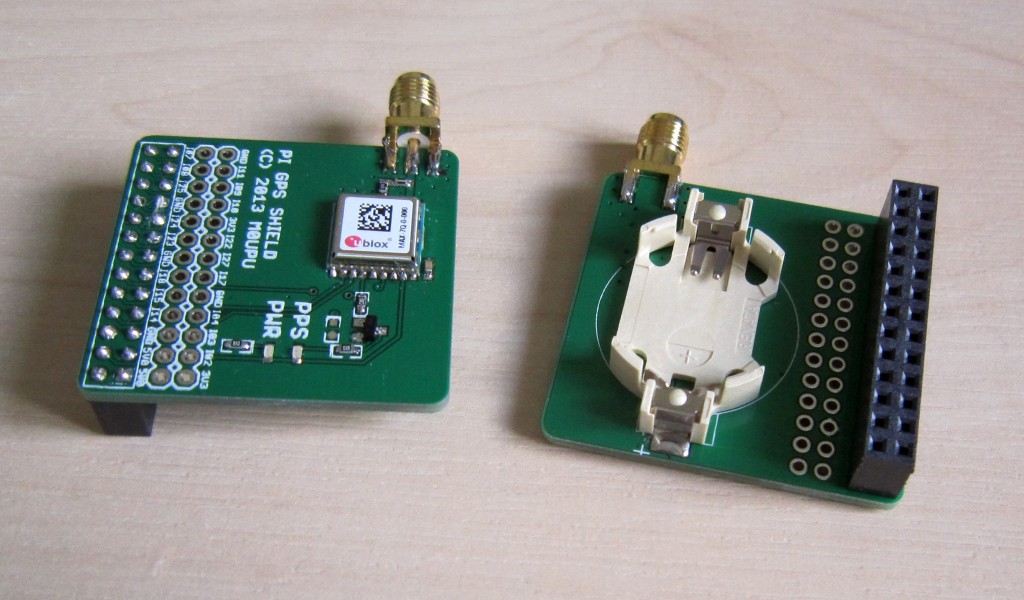
To keep the board simple it just features the MAX-7Q, a Raspberry Pi header, battery, power and PPS LED’s and provision for an SMA connected active patch antenna (puck) :

ntpi-1

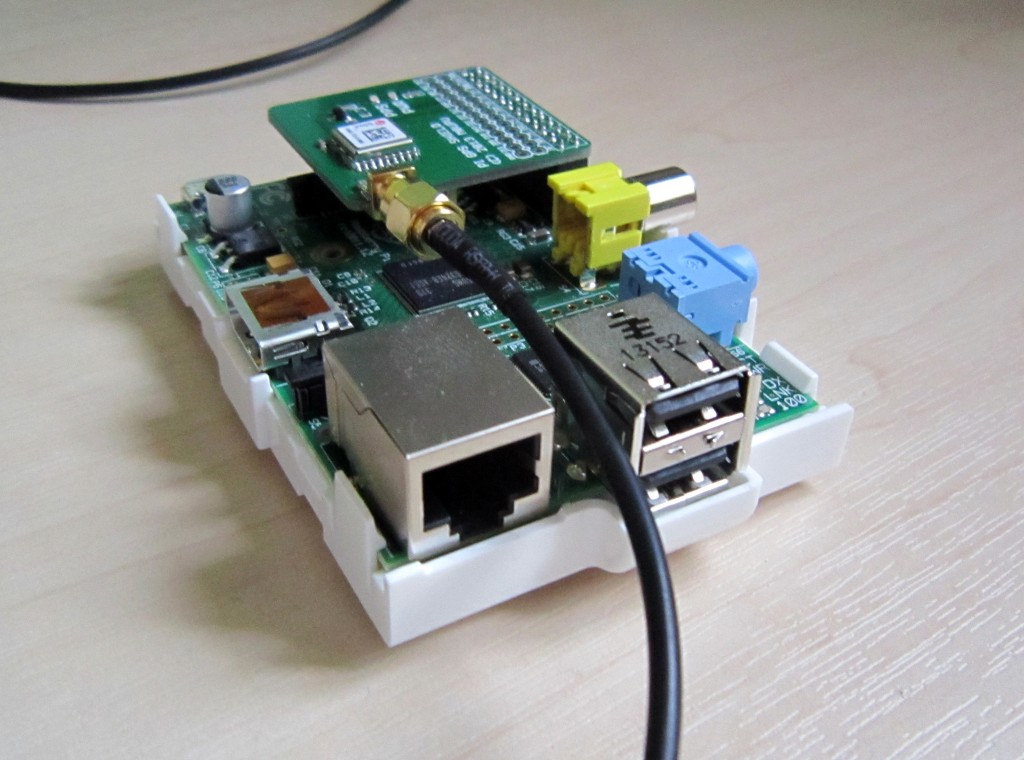
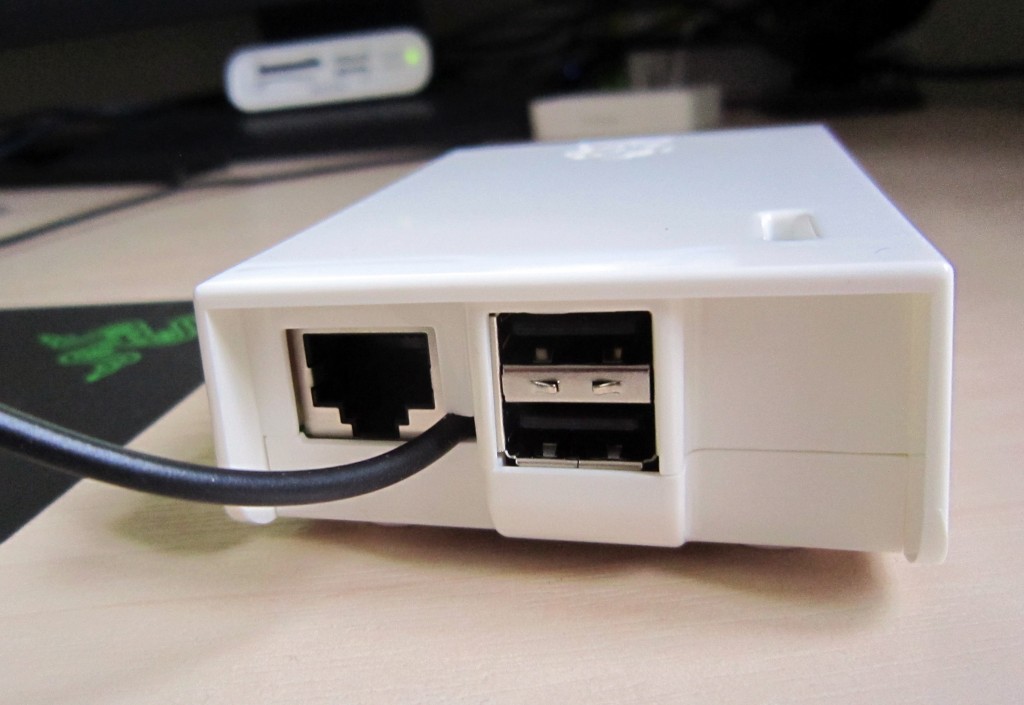
The MAX-7Q is connected via serial to the Pi and the PPS is connected to GPIO18 (pin 12). The design is such that it should fit in a case (I’ve only tested it in the Multicomp MC-RP001). The Pi GPIO’s are passed through to an unpopulated header should you wish to connect other items to the Pi. When in place the antenna cable exits between the USB and RJ45 connectors :

ntpi-2A simple snip of the case with some wire cutters allows the top to be attached :

ntpi-3

Resulting in a nice tidy NTP Server. The made up boards can be purchased from HAB Supplies here http://ava.upuaut.net/store/index.php?route=product/product&path=59_60&product_id=95

I haven’t intended this board to be used in Pi powered HAB stuff due to the way the Pi interfaces with radio the GPS needs to connect via I2C. This board connects the GPS via serial so please bear that in mind.

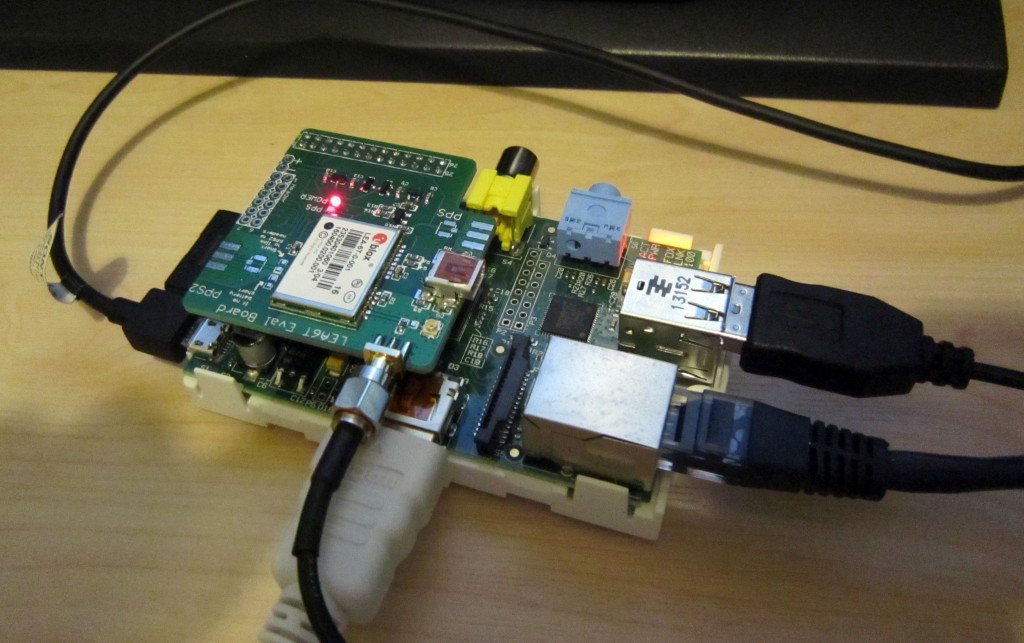
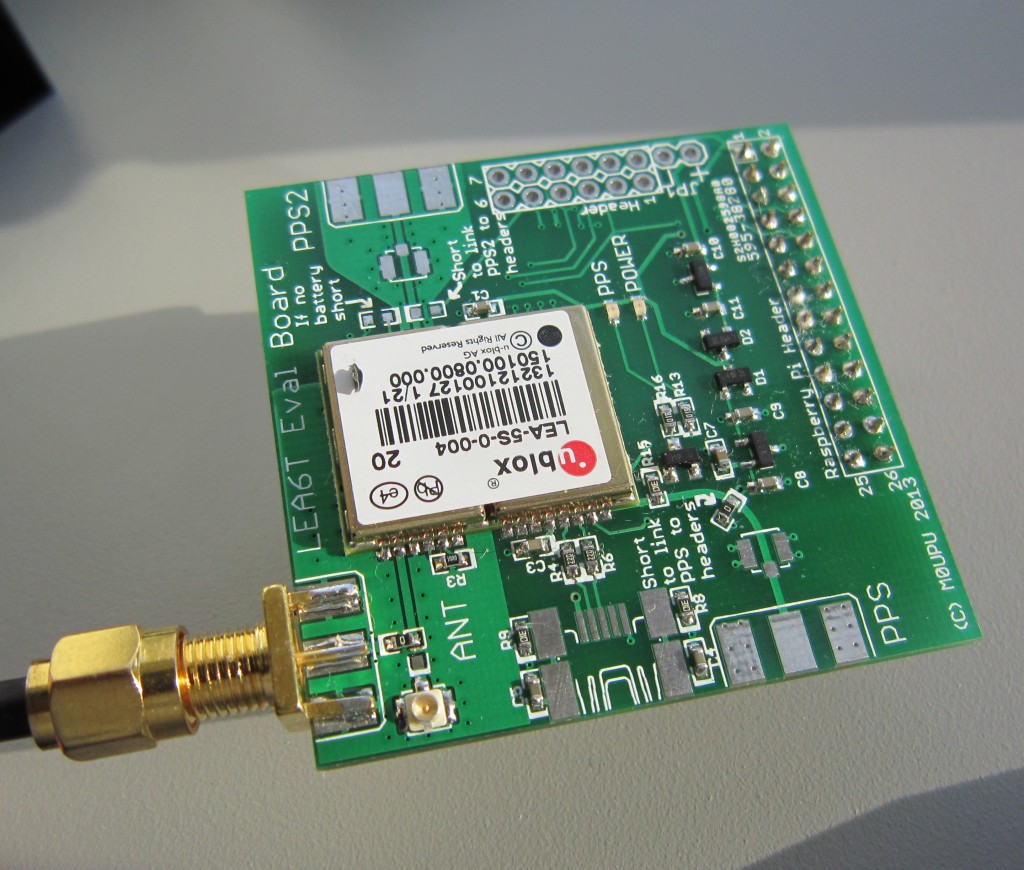
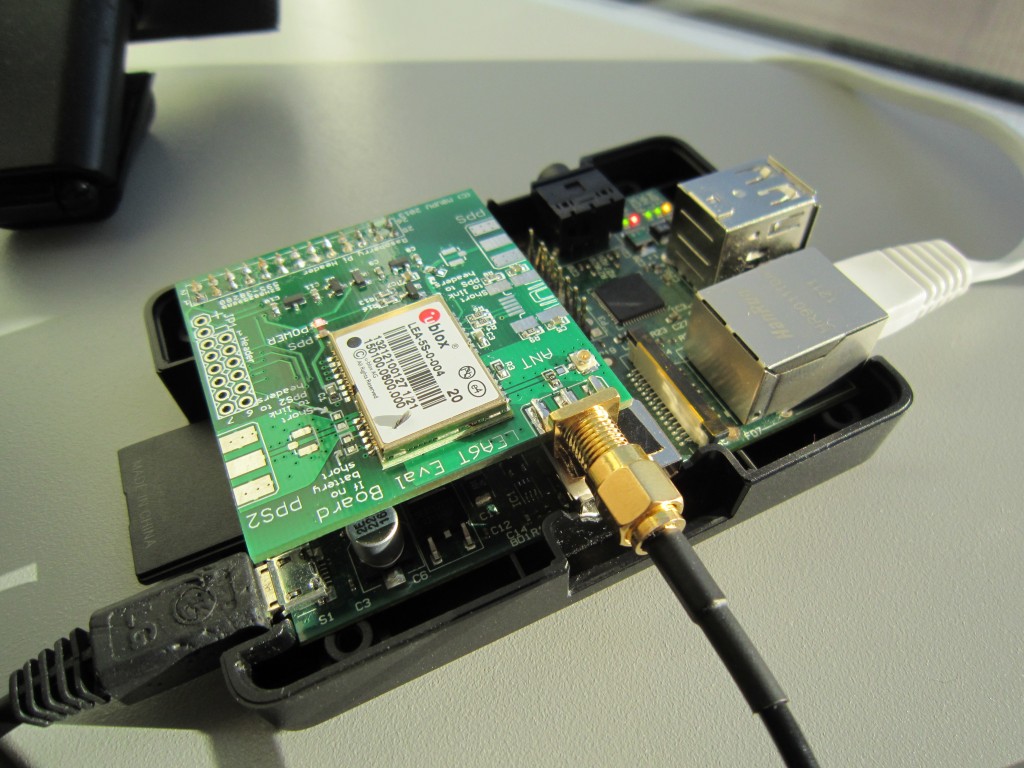
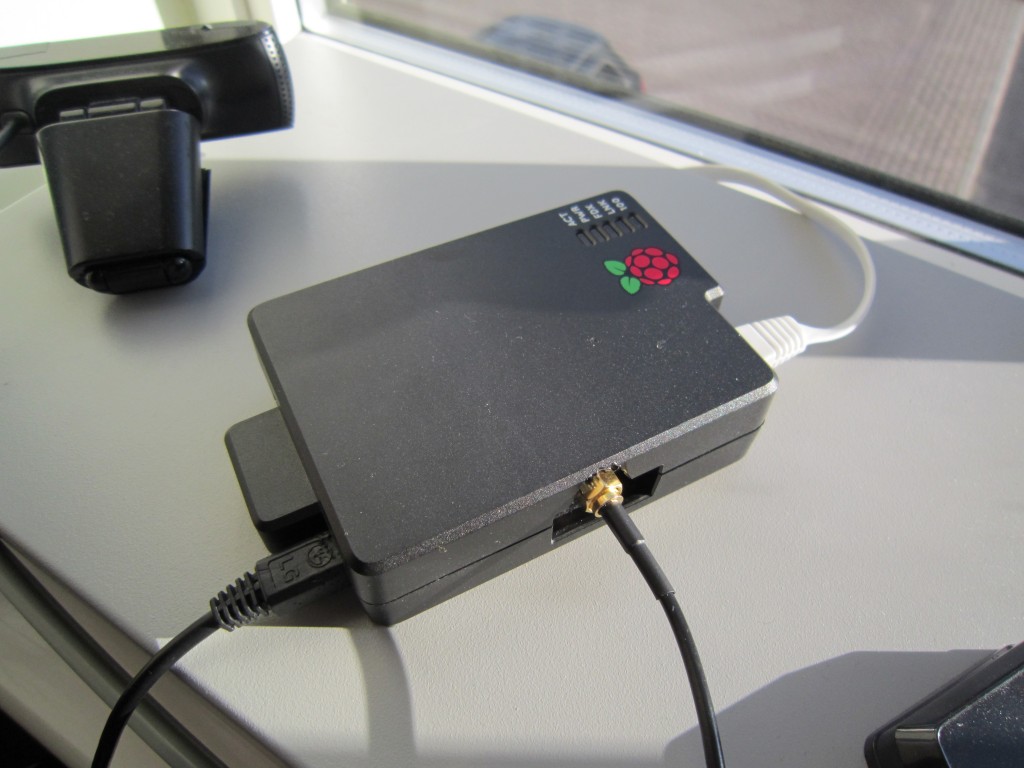
I also took the opportunity to fix the design fault with the LEA eval board and can also supply these with LEA-6T timing modules or LEA-5S modules as needed. The LEA eval board is designed as more of a multipurpose board featuring PPS and (where LEA-6T fitted) PPS2 outputs. SMA or u.FL inputs. USB to connect to a PC, Pi header to connect to a Pi, generic header for other uses. Board can be powered by header, USB or Pi header. The board does fit in a Pi case but its tight and the antenna exits over the HDMI :

ntpi-4If this board is of interest leave me a message and I’ll contact you to discuss your requirements.

NTPi – Raspberry Pi as a Stratum-1 NTP Server Hardware

David Taylor over at Satsignal.Eu has done a wonderful article on turning your Raspberry Pi into a Stratum 1 NTP server. A Stratum 1 NTP server is one that is connected directly to a Stratum-0 device such as a GPS. I made an initial device up based one of the Ublox GPS modules from Hab Supplies however with its passive antenna and limited wiring it had to be near a window to work.

Also the MAX6Q GPS modules used aren’t designed for timing applications, however that said I achieved a fairly reasonable level of accuracy of 6ms. I decided to make up a PCB to utilise the proper timing module the LEA-6T this would act as an evaluation board featuring USB for connection to a PC, separate outputs for the PPS and PPS2 finally it would feature a header to permit direct connection to the Raspberry Pi.

Osmocom have designed a PCB which is similar however I have enhanced it a little with a PPS LED, Raspberry Pi header and I changed the regulators as the LEA doesn’t need the larger regulators. Additionally the Osmocom part for the LEA had some very odd solder mask on it and had to be redone.IMG_1937Here you can see the board with an LEA-5S on for testing. Although it looks similar to the Osmocom part the board was designed from scratch this fits on the Pi :IMG_1934The case still fits on nicely (with a little modification!) :IMG_1935

I‘ve released this board as open source and its on Github here. I do have some spare PCB’s free which I can supply to your spec with either a LEA-5S fitted or the LEA-6T. PCB’s are £3.50 , boards assembled with LEA-5S are £40.00 and with the 6T £100.00. Send me a comment if this is of interest, these boards will be built to spec.

A Stratum 1 NTP server for £50 is a bit of a bargin!

PAVA/ATLAS Hardware

A number of people have asked for some more technical details on the AVA tracker hardware. The full name for the board is PAVA/ATLAS and it is a prototype based on my existing PAVA boards developed with the help of James Coxon, Phil Heron, Nigel Smart, Ed Moore and Dave Akerman.

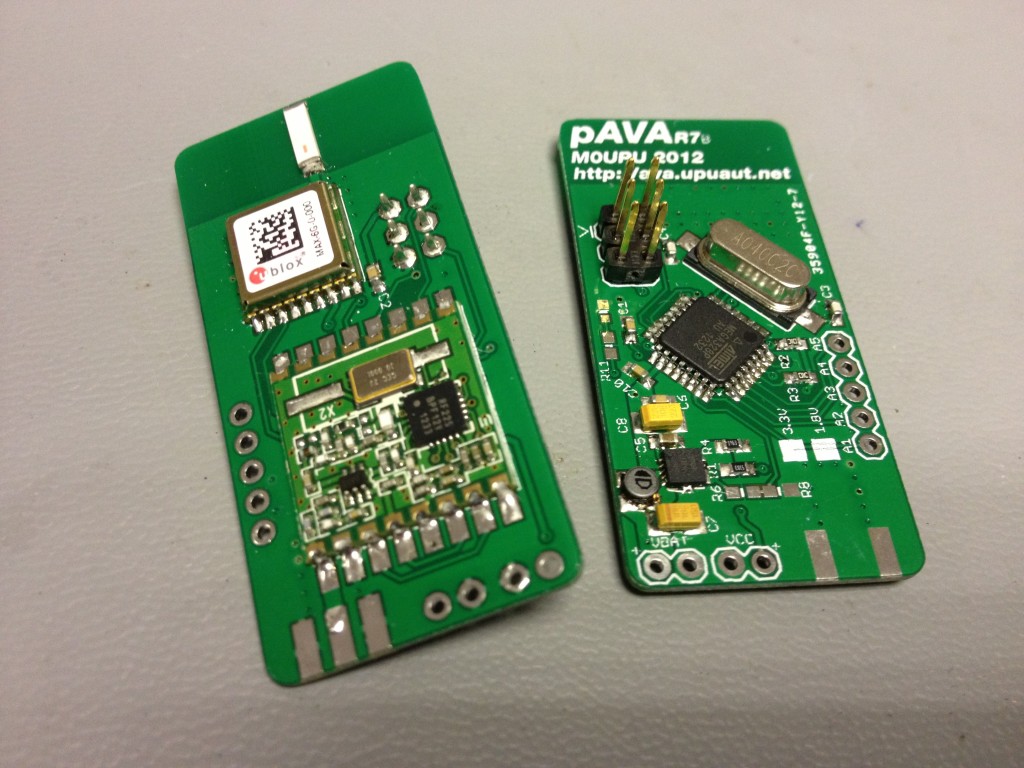
PAVA is a 70cms tracker board based on an ATMega328P Microcontroller, Ublox MAX6 GPS and a HopeRF RFM22B radio module. PAVA was born from a desire to make a tracker small enough and power efficient enough to be run from a single battery for enough time for a flight and possibly to reside in the neck of a balloon. To facilitate the use of the single cell a Texas TPS61200DRC boost converter is used.

The board was designed to initially run at 3.3v but have the option for running at 1.8v for increased power savings. 3.3v boards use a TPS61201 with a 0R0 in place. 1.8v boards use a TPS61200 with a 510k / 197k resistors to set the voltage. When running at 1.8v the AVR uses a 4Mhz crystal, 3.3v uses an 8Mhz crystal. Extensive work was done on the software and with a combination of the 1.8v hardware and the power saving in code the battery life was increased from 11 hours to about 47 hours.

2012-12-27 14.25.18

A combination of the the hardware and software meant the PAVA boards were a very light, robust and good base for future projects.

PAVA/ATLAS was born out of Project Swift. The Swift board was a powerful but large board designed to do concurrent APRS transmissions outside of UK airspace and transmit RTTY telemetry as well. Although a good board there were a number of issues with Swift, namely the power requirements, weight and cost. James Coxon proposed a light weight version that could do the same but potentially under a foil balloon.

Taking the existing design for the PAVA boards a modified version was made to facilitate mounting a Radiometrix HX1 transmitter piggy back on it. Retaining the existing 1.8v board additional features were added, the GPS was wired to the batteries for hot starts. The GPS has a FET based power switch so it could be turned off entirely. The HX1 was mounted on a separate mezzanine board.

With its own 5V step up that could be switched on and off from the AVR it only needed to be on when transmitting then it was turned off again. To get the voltage up to the right level a transistor was used. The HX1 board mounted on top of the microcontroller board. To ensure the GPS antenna wasn’t obscured by the HX1 the board was extended slightly.

The board is very prototype and there are a number of errors on it :

a) RFM22B must be pulled down not up. This is fairly easy to fix as SDN is right next to GND so you can bridge it with a 0603 10k.
b) HX1TXD pin fouls the ICSP header. This was just a stupid mistake, you end up bending the pin to get the programmer on.
c) Holes for the Samtec headers are too large.
d) A polygon priority mistake left VBATT connected to GND. Pretty much a show stopper fixed with some careful scalpel surgery.
e) HX1 APRS TXD is on pin 11 which is use by the RFM22B. Cut the track and rewired it to the other interrupt pin 3.

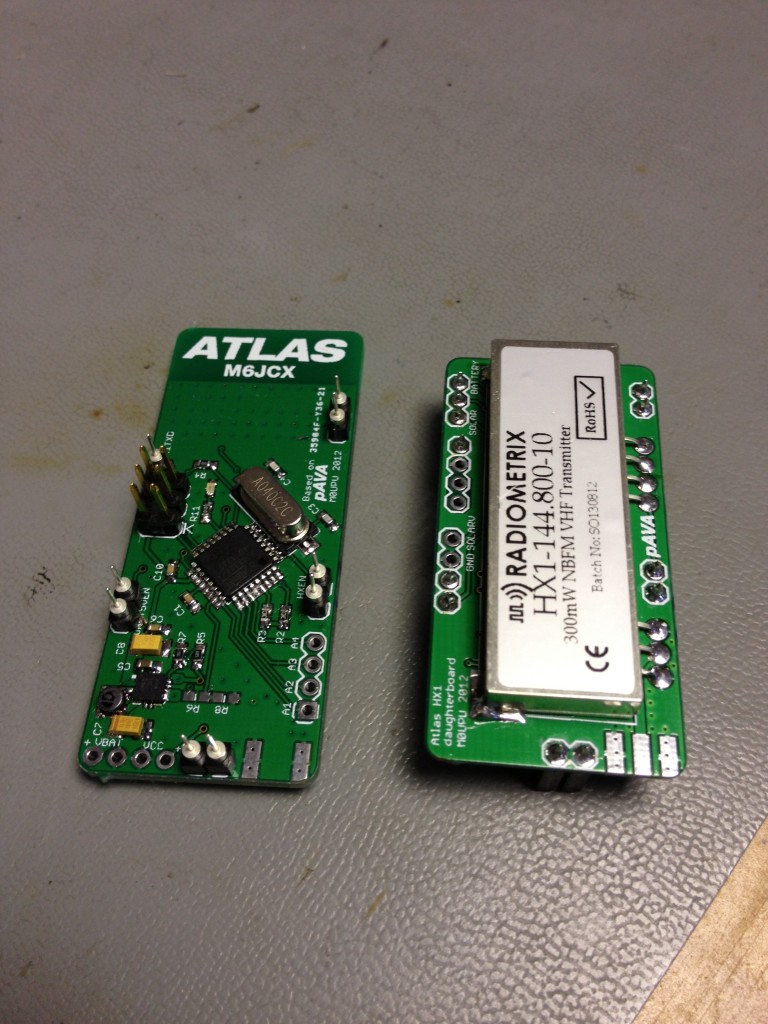
Microcontroller board on the left, HX1 board on the right:

IMG_1064

Underside (RFM22B & GPS to be attached)IMG_1065

The board weighed in at 16g and could run for way over 24 hours from a pair of AA’s with the APRS transmitting every 2 mins.

Hardware is only half the story. To comply with the UK legislation the APRS transmitter could not be used in the air (this also applies to other countries in the EU). Taking geofencing code from Project Swift & work done by Steve Randall a map of Europe was built up using Google Earth ( See this map ) and converted to code. See this post for more info: Preparing for a European Floater.

Once the payload knew where it was it could disable the APRS transmitter to comply with the local legislation. Additionally it could generate the correct ITU prefix for the callsign. This code was tested on two PAVA flights without the APRS module attached to iron out any bugs. The first test indicated the UK Geofence wasn’t correct.

The code use is here : https://github.com/Upuaut/APRS_Projects/tree/master/Pico92

The board will probably be redesigned as a single PCB.